设计原则
1. 什么是设计
- 设计指的是采用特定的思路或标准来实现功能。
- 即使实现相同的功能,设计的方式可以多种多样。
- 当需求不断变化时,设计的重要性才会更加明显。
2. SOLID 五大设计原则
| 首字母 | 指代 | 概念 |
|---|---|---|
| S | 单一职责原则 | 单一功能原则认为对象应该仅具有一种单一功能的概念 |
| O | 开放封闭原则 | 开闭原则认为软件体应该是对于扩展开放的,但是对于修改封闭的的概念 |
| L | 里氏替换原则 | 里氏替换原则认为程序中的对象应该是可以在不改变程序正确性的前提下被它的子类所替换的的概念 |
| I | 接口隔离原则 | 接口隔离原则认为多个特定客户端接口要好于一个宽泛用途的接口的概念 |
| D | 依赖反转原则 | 依赖反转原则认为一个方法应该遵从依赖于抽象而不是一个实例的概念,依赖注入是该原则的一种实现方式。 |
-
开放封闭原则
-
对扩展开放,对修改关闭
-
增加需求时,扩展新代码,而非修改已有代码
-
对近期可能会变化并且如果有变化但改动量巨大的地方要增加扩展点,扩展点过多会降低可读性
-
开闭原则是设计模式中的总原则
1
2
3
4
5
6
7
8
9
10
11
12
13
14
15
16
17
18
19
20
21
22
23
24
25
26
27
28
29
30
31
32
33
34
35
36
37
38
39
40
41
42
43
44
45
46
47
48
49
50
51
52
53
54
55
56
57
58
59
60
61
62
63
64
65
66
67
68
69
70
71
72
73
74
75
76
77
78
class Customer {
    constructor(public rank: string) { }
}
class Product {
    constructor(public name: string, public price: number) {

    }
    cost(customer: Customer) {
        switch (customer.rank) {
            case 'member':
                return this.price * .8;
            case 'vip':
                return this.price * .6;
            default:
                return this.price;
        }
    }
}
let p1 = new Product('笔记本电脑', 1000);
let member = new Customer('member');
let vip = new Customer('vip');
let guest = new Customer('guest');
console.log(p1.cost(member));
console.log(p1.cost(vip));
console.log(p1.cost(guest));
class Customer {
+    constructor(public rank: string, public discount: number = 1) { }
+    getDiscount() {
+        return this.discount;
+    }
}
class Product {
    constructor(public name: string, public price: number) {

    }
    cost(customer: Customer) {
-        /*  switch (customer.rank) {
-             case 'member':
-                 return this.price * .8;
-             case 'vip':
-                 return this.price * .6;
-             default:
-                 return this.price;
-         } */
+        return this.price * customer.getDiscount();
    }
}
+let p1 = new Product('笔记本电脑', 1000);
+let member = new Customer('member', .8);
+let vip = new Customer('vip', .6);
let guest = new Customer('guest');
console.log(p1.cost(member));
console.log(p1.cost(vip));
console.log(p1.cost(guest));
import axios, { AxiosInstance, AxiosRequestConfig } from 'axios';
let instance: AxiosInstance = axios.create();
instance.interceptors.request.use((config: AxiosRequestConfig) => {
    config.url = 'http://localhost:8080' + config.url;
    return config;
});

instance.interceptors.response.use(response => {
    if (response.status !== 200 || response.data.code != 0) {
        return Promise.reject(response);
    } else {
        return response.data.data;
    }
})
/**
 * {code:0,data:{id:1,name:'pf'}}
 */
instance({
    url: '/api/users'
}).then(result => {
    console.log(result);
}, error => {
    console.error(error);
});
-
-
单一职责原则
-
一个类或者模块只负责完成一个职责,如果功能特别复杂就进行拆分
-
单一职责可以降低类的复杂性,提高代码可读性、可维护性
-
当类代码行数过多、方法过多、功能太多、职责太杂的时候就要对类进行拆分了
-
拆分不能过度,如果拆分过度会损失内聚性和维护性
1
2
3
4
5
6
7
8
9
10
class Product {
    public name: string;
-    public categoryName: string;
-    public categoryIcon: string;
+     public category:Category;
}
+class Category {
+    public name: string;
+    public icon: string;
+}
-
-
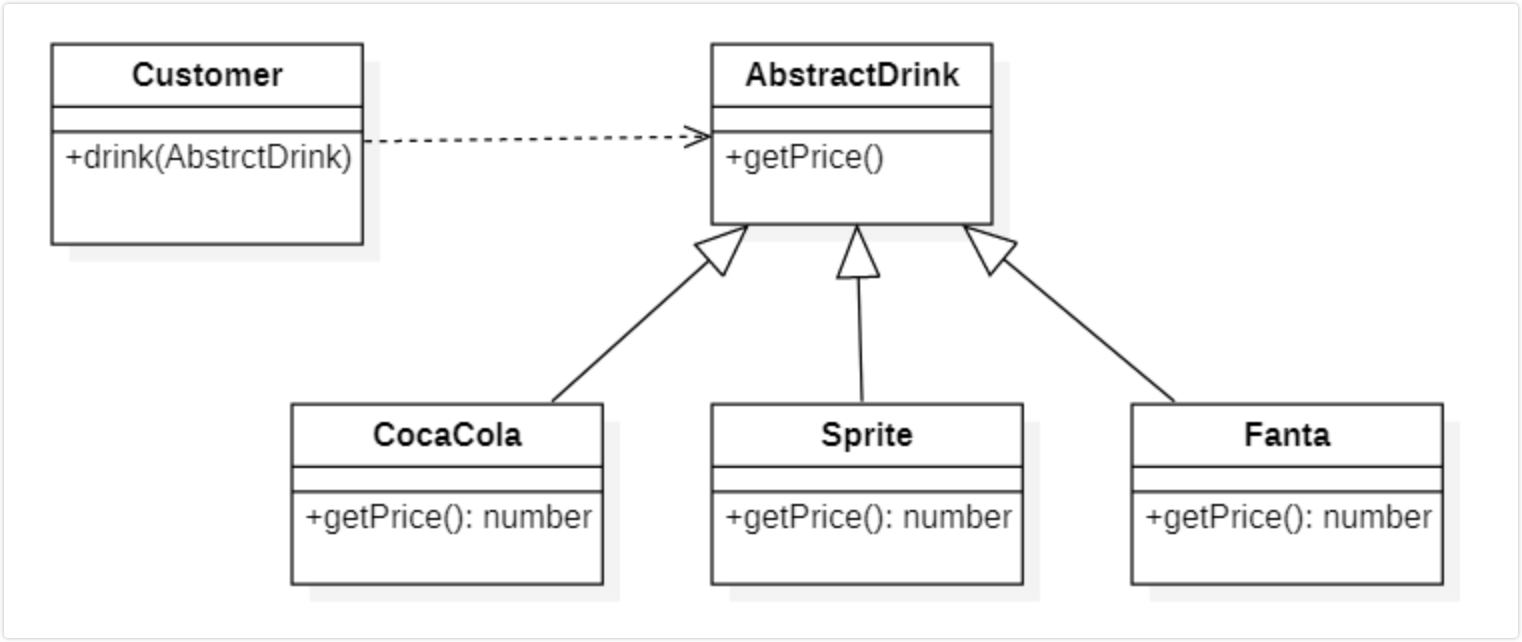
里氏替换原则
-
所有引用基类的地方必须能透明地使用其子类的对象
-
子类能替换掉父类,使用者可能根本就不需要知道是父类还是子类,反之则不行
-
里氏替换原则是开闭原则的实现基础,程序设计的时候尽量使用基类定义及引用,运行时再决定使用哪个子类
-
里氏替换原则可以提高代码的复用性,提高代码的可扩展性,也增加了耦合性
-
相对于多态,这个原则讲的是类如何设计,子类如果违反了父类的功能则表示违反了里氏替换原则
1
2
3
4
5
6
7
8
9
10
11
12
13
14
15
16
17
18
19
20
21
22
23
24
25
26
27
28
29
30
31
32
33
34
35
36
37
38
39
40
41
42
43
44
45
46
47
48
49
abstract class AbstractDrink {
    abstract getName(): string;
}
class CocaCola extends AbstractDrink {
    getName(): string {
        return '可乐';
    }
}
class Sprite extends AbstractDrink {
    getName(): string {
        return '雪碧';
    }
}
class Fanta extends AbstractDrink {
    getName(): string {
        return '芬达';
    }
}
class Customer {
    drink(drink: AbstractDrink) {
        console.log('喝' + drink.getName());
    }
}
let customer = new Customer();
let cocaCola = new CocaCola();
let sprite = new Sprite();
let fanta = new Fanta();
customer.drink(cocaCola);
customer.drink(sprite);
customer.drink(fanta);
import React from 'react';
import ReactDOM from 'react-dom';
class App extends React.Component {
    render() {
        return (
            <div>App </div>
        )
    }
}
let element = React.createElement(App);
ReactDOM.render(element, document.getElementById('root'));
abstract class AbstractDrink {
    abstract getName(): any;
}
class CocaCola extends AbstractDrink {
    getName(): any {
        return 100;
    }
}
-
-
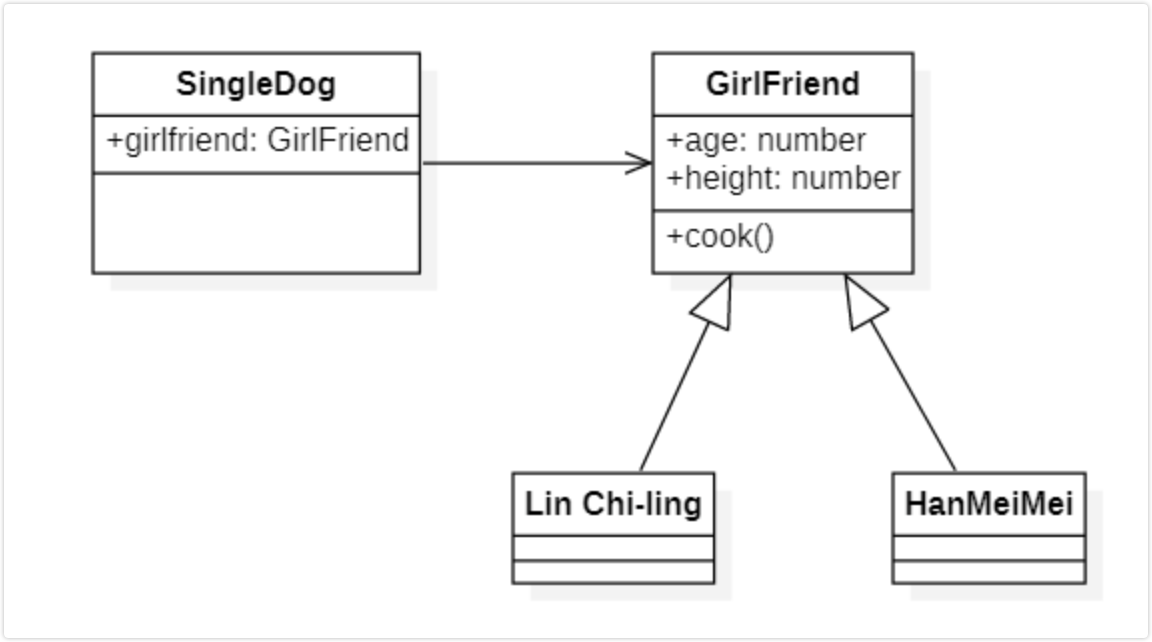
依赖倒置原则
-
面向接口编程,依赖于抽象而不依赖于具体实现
-
要求我们在程序代码中传递参数时或在关联关系中,尽量引用层次高的抽象层类
-
使用方只关注接口而不关注具体类的实现
1
2
3
4
5
6
7
8
9
10
11
12
13
14
15
16
17
18
19
20
21
22
23
24
25
26
27
28
29
30
31
32
33
abstract class GirlFriend {
    public age: number;
    public height: number;
    public abstract cook(): void;
}
class LinZhiLing extends GirlFriend {
    public cook(): void {

    }
}
class HanMeiMei extends GirlFriend {
    public cook(): void {

    }
}
class SingleDog {
    constructor(public girlFriend: GirlFriend) {

    }
}
let s1 = new SingleDog(new LinZhiLing());
let s2 = new SingleDog(new HanMeiMei());
import { createStore } from 'redux';
let store = createStore(state => state);
export interface Action<T = any> {
    type: T
}
export interface AnyAction extends Action {
    // Allows any extra properties to be defined in an action.
    [extraProps: string]: any
}
let action: AnyAction = { type: 'increment', payload: 5 }
store.dispatch(action);
-
-
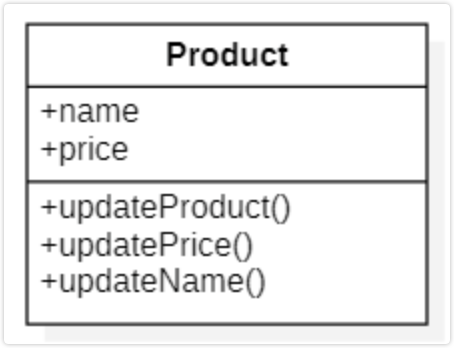
接口隔离原则
-
保持接口的单一独立,避免出现胖接口
-
客户端不应该依赖它不需要的接口,类间的依赖关系应该建立在最小的接口上
-
接口尽量细化,而且接口中的方法尽量的少
-
类似于单一职责原则,更关注接口
1
2
3
4
5
6
7
8
9
10
11
12
13
14
15
16
17
18
19
20
21
22
23
interface IUserManager {
  updateUserInfo(): void;
  updatePassword(): void;
}
interface IProductManager {
  updateProduct(): void;
  updatePrice(): void;
}

interface Running {
  run(): void;
}
interface Flying {
  fly(): void;
}
interface Swimming {
  swim(): void;
}
class Automobile implements Running, Flying, Swimming {
  run() {}
  fly() {}
  swim() {}
}
-
3. 合成复用原则
-
类的关系
-
类之间有三种基本关系,分别是关联(聚合和组合)、泛化和依赖
-
如果一个类单向依赖另一个类,那么它们之间就是单向关联。如果彼此依赖,则为相互依赖,即双向关联
-
关联关系包括两种特例:聚合和组合
-
聚合表示整体与部分的关系或
拥有关系,部分对象可能会被整体拥有,但不一定会随着整体的消亡而销毁,如班级与学生。 -
合成或者说组合要比聚合关系强的多,部分和整体的生命周期是一致的,比如人和器官之间

-
-
-
合成复用原则
-
合成复用原则是通过将已有的对象纳入新对象中,作为新对象的成员对象来实现的
-
新对象可以调用已有对象的功能,从而达到复用
-
原则是尽量首先使用组合/聚合的方式,而不是使用继承
1
2
3
4
5
6
7
8
9
10
11
class Cooker {
  cook() {

  }
}
class Person {
  private cooker: Cooker = new Cooker();
cook() {
  this.cooker.cook();
}
}
-
4. 总结
- 开闭原则是核心,对修改关闭对扩展开放是软件设计的基石。
- 单一职责要求我们在设计接口和模块功能时,尽量保证其单一性和原子性,以确保修改时不会影响全局或其他模块。
- 里氏替换原则和依赖倒置原则要求面向接口和抽象编程,不要依赖具体实现,否则实现一改,上层调用者就要对应修改。
5. 如何写出好代码
- 可维护性:代码中的 BUG 是否易于修复?
- 可读性:代码是否容易理解?
- 可扩展性:是否方便添加新功能?
- 灵活性:添加新功能时是否容易?现有方法和接口是否易于复用?
- 简洁性:代码是否简单清晰?
- 可复用性:相同的代码是否被避免重复编写?
- 可测试性:是否容易编写单元测试和集成测试?
23 种设计模式
创建型:
工厂模式(工厂方法模式、抽象工厂模式、简单工厂模式)、建造者模式、单例模式、原型模式结构型模式:
代理模式、桥接模式、装饰器模式、适配器模式、外观模式、组合模式、享元模式。行为型:
观察者模式、模版方法模式、策略模式、职责链模式、迭代器模式、状态模式、访问者模式、备忘录模式、命令模式、解释器模式、中介者模式。
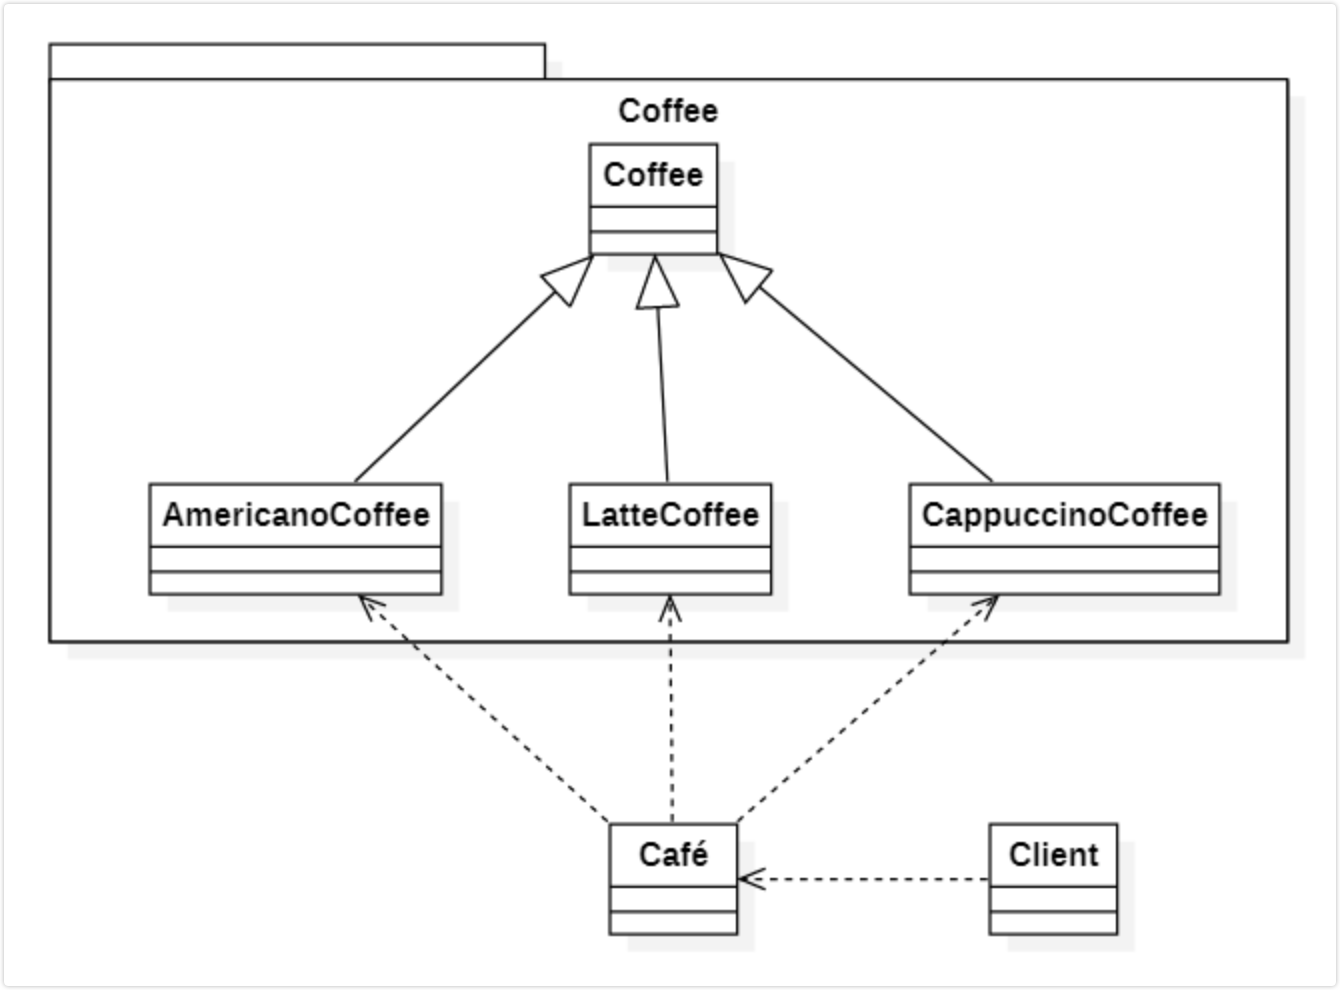
1. 简单工厂模式
简单工厂模式是由一个工厂对象决定创建出哪一种产品类的实例
1
2
3
4
5
6
7
8
9
10
11
12
13
14
15
16
17
18
19
20
21
22
23
24
25
26
27
28
29
30
31
32
33
34
35
36
37
38
39
40
41
42
43
44
45
46
47
48
49
50
51
52
53
54
55
56
57
58
59
60
61
// 缺点:如果产品的种类非常多`switch case`的判断会变得非常多。不符合开放—封闭原则,如果要增加或删除一个产品种类,就要修改`switch case`的判断代码。
abstract class Coffee {
  constructor(public name: string) {

  }
}
class AmericanoCoffee extends Coffee {
  constructor(public name: string) {
    super(name);
  }
}
class LatteCoffee extends Coffee {
  constructor(public name: string) {
    super(name);
  }
}
class CappuccinoCoffee extends Coffee {
  constructor(public name: string) {
    super(name);
  }
}

class Café {
  static order(name: string) {
    switch (name) {
      case 'Americano':
        return new AmericanoCoffee('美式咖啡');
      case 'Latte':
        return new LatteCoffee('拿铁咖啡');
      case 'Cappuccino':
        return new LatteCoffee('卡布奇诺');
      default:
        return null;
    }
  }
}
console.log(Café.order('Americano'));
console.log(Café.order('Latte'));
console.log(Café.order('Cappuccino'));

// 应用场景 jQuery
class jQuery{
  constructor(selector){
    let elements = Array.from(document.querySelectorAll(selector));
    let length = elements?elements.length:0;
    for(let i=0;i<length;i++){
      this[i]=elements[i];
    }
    this.length = length;
  }
  html(html){
    if(html){
      this[0].innerHTML=html;
    }else{
      return this[0].innerHTML;
    }
  }
}
window.$ = function(selector){
  return new jQuery(selector);
}
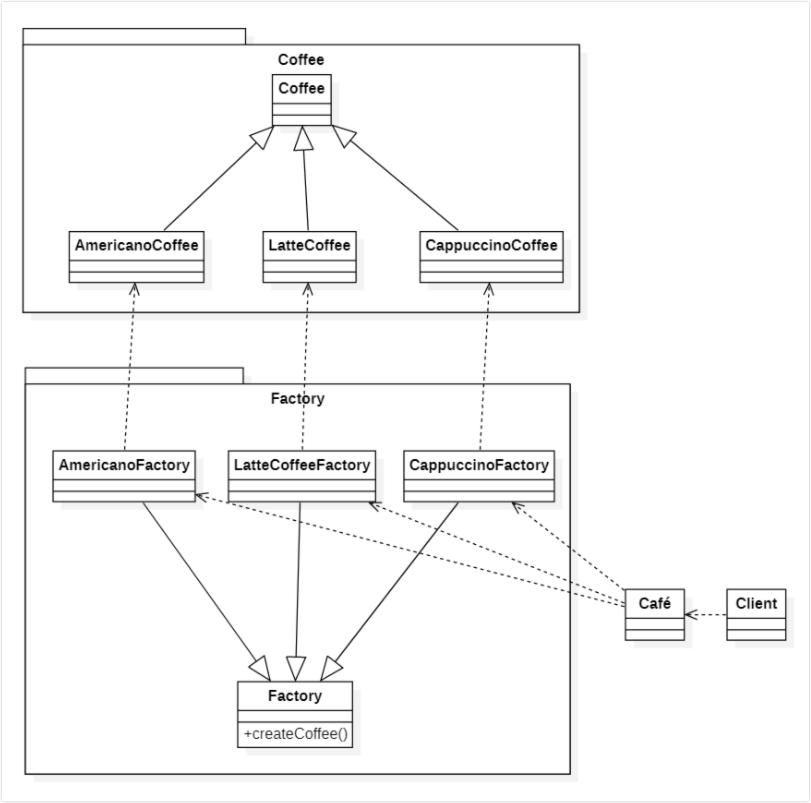
2. 工厂方法模式
工厂方法模式又称多态性工厂模式。核心的工厂类不再负责所有的产品的创建,而是将具体创建的工作交给工厂子类去做。
1
2
3
4
5
6
7
8
9
10
11
12
13
14
15
16
17
18
19
20
21
22
23
24
25
26
27
28
29
30
31
32
33
34
35
36
37
38
39
40
41
42
43
44
45
46
47
48
49
50
51
52
53
54
55
56
57
58
export { }
abstract class Coffee {
  constructor(public name: string) {

  }
}
abstract class Factory {
  abstract createCoffee(): Coffee;
}
class AmericanoCoffee extends Coffee {
  constructor(public name: string) {
    super(name);
  }
}

class AmericanoCoffeeFactory extends Factory {
  createCoffee() {
    return new AmericanoCoffee('美式咖啡')
  }
}

class LatteCoffee extends Coffee {
  constructor(public name: string) {
    super(name);
  }
}
class LatteCoffeeFactory extends Factory {
  createCoffee() {
    return new LatteCoffee('拿铁咖啡')
  }
}
class CappuccinoCoffee extends Coffee {
  constructor(public name: string) {
    super(name);
  }
}
class CappuccinoFactory extends Factory {
  createCoffee() {
    return new CappuccinoCoffee('卡布奇诺')
  }
}
class Café {
  static order(name: string) {
    switch (name) {
      case 'Americano':
        return new AmericanoCoffeeFactory().createCoffee();
      case 'Latte':
        return new LatteCoffeeFactory().createCoffee();
      case 'Cappuccino':
        return new CappuccinoFactory().createCoffee();
      default:
        return null;
    }
  }
}
console.log(Café.order('Americano'));
console.log(Café.order('Latte'));
console.log(Café.order('Cappuccino'));
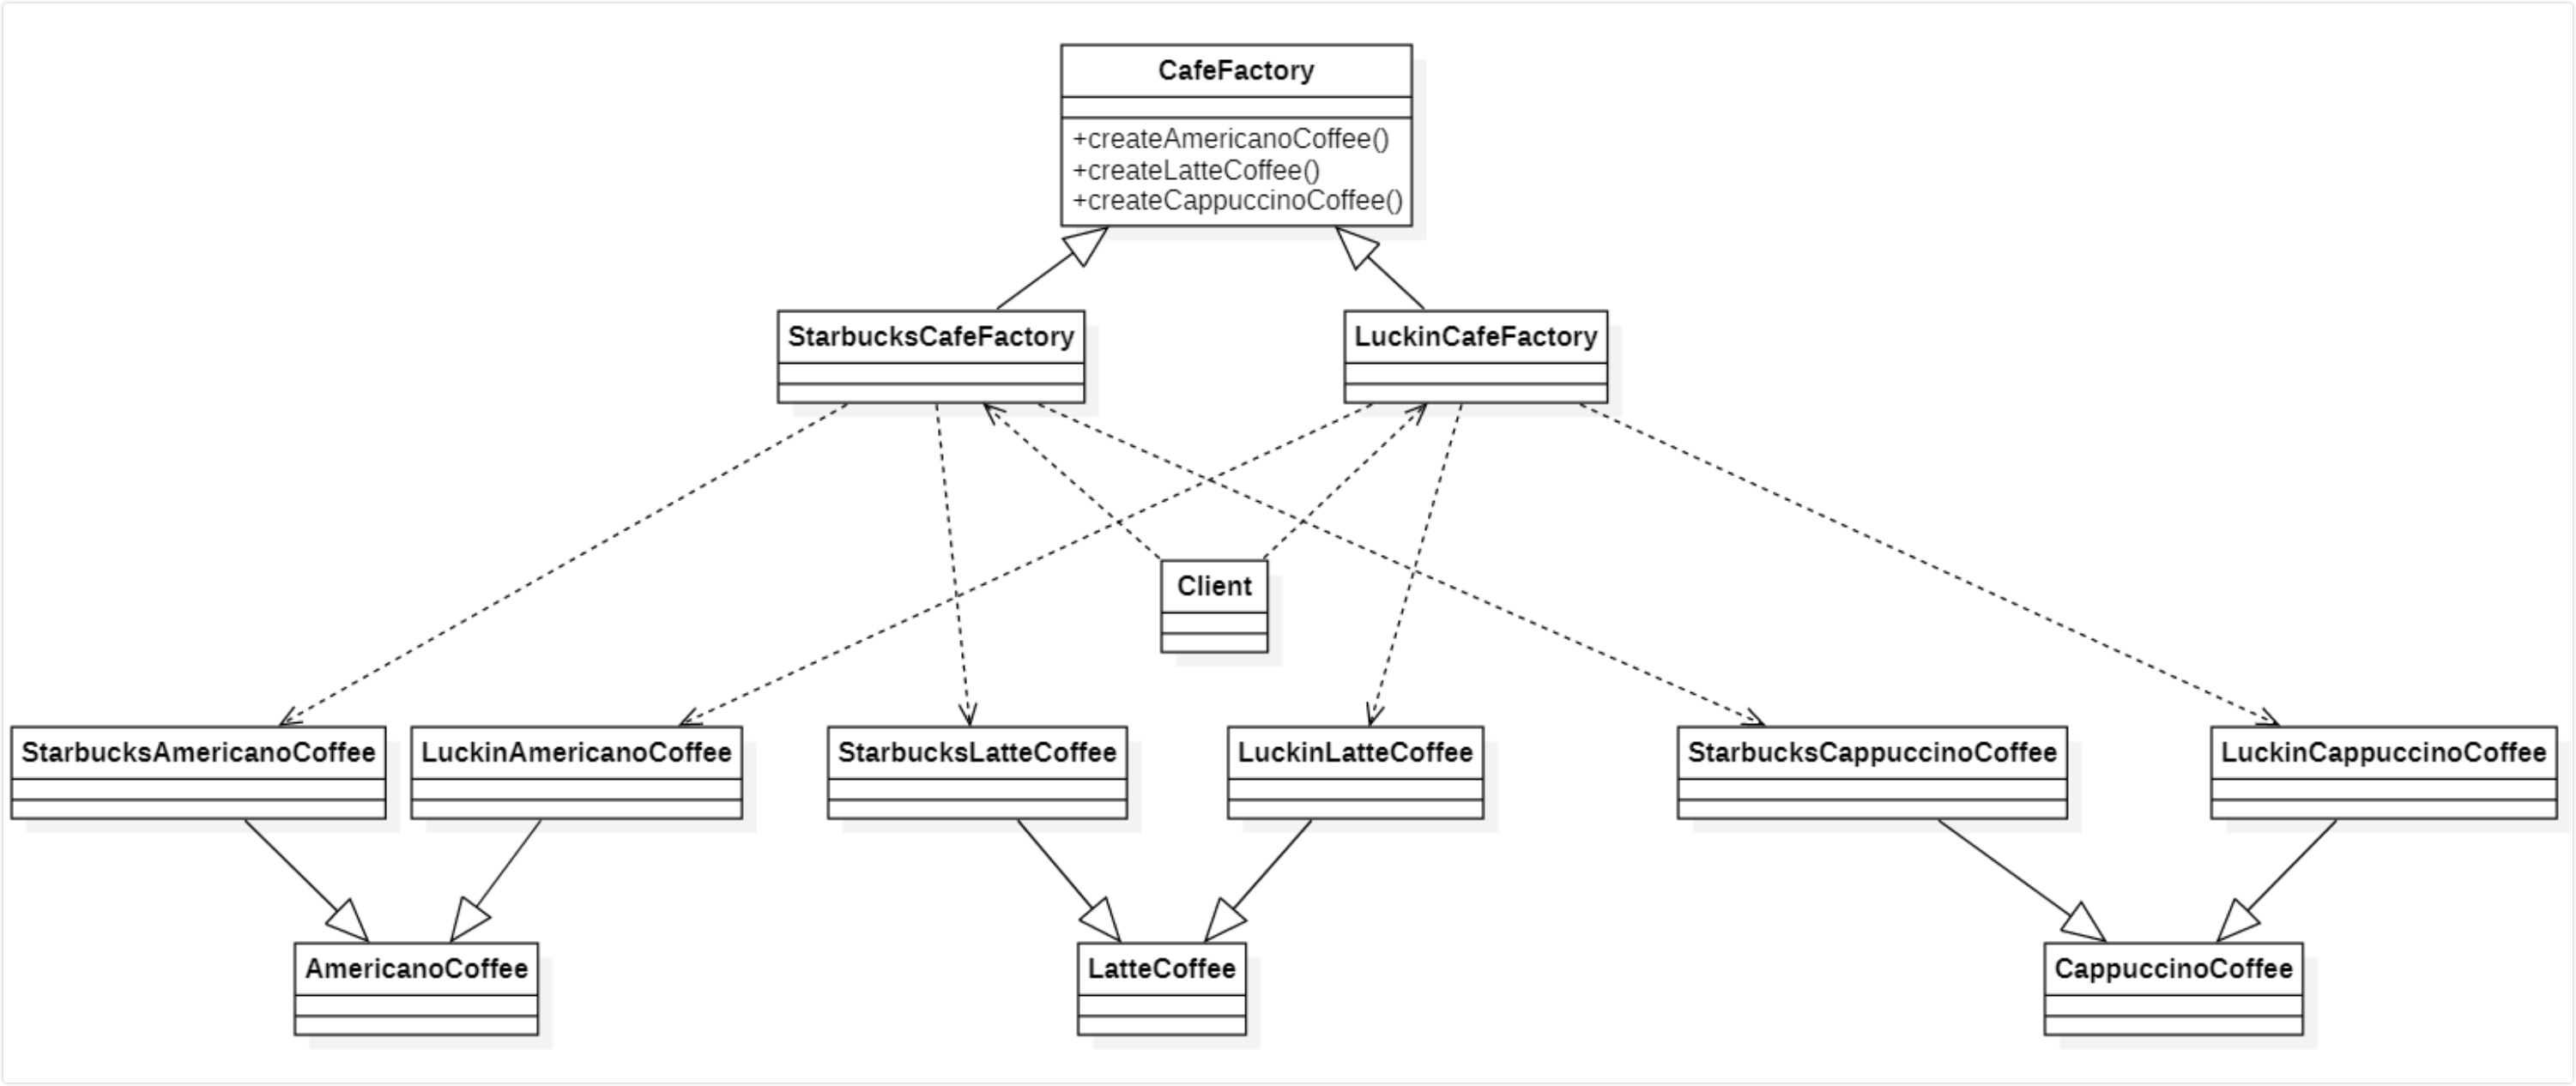
3. 抽象工厂模式
抽象工厂模式可以向客户端提供一个接口,使客户端在不必指定产品的具体的情况下,创建多个产品族中的产品对象
- 工厂方法模式针对的是同一类或同等级产品,而抽象工厂模式针对的是多种类的产品设计
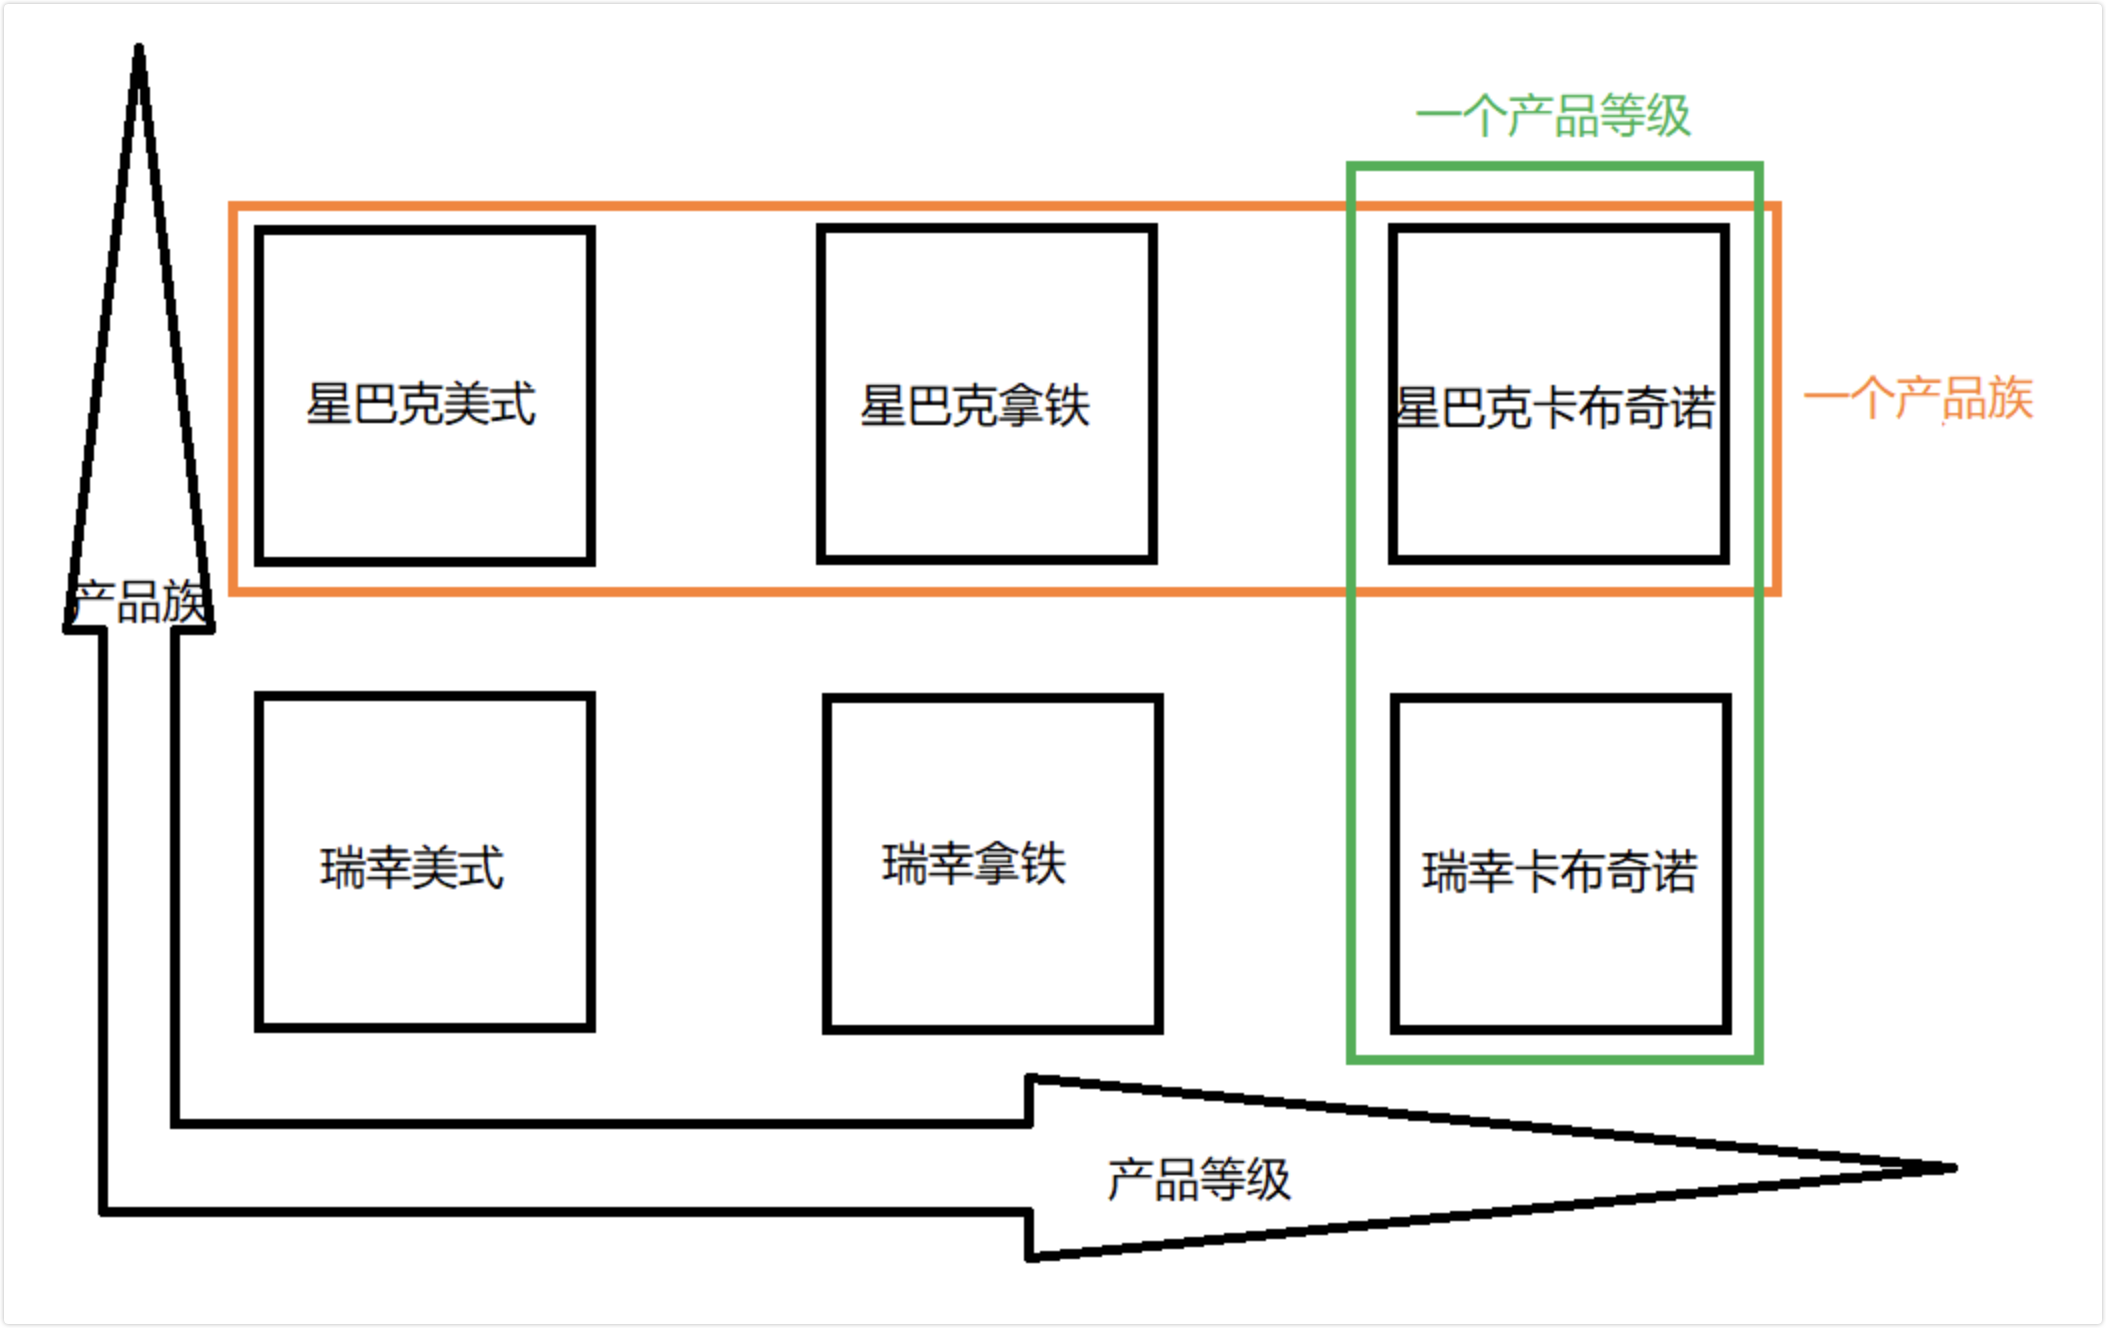
- 系统中有多个产品族,每个具体工厂负责创建同一族但属于不同产品等级(产品种类)的产品
- 产品族是一组相关或相互依赖的对象
- 系统一次只能消费某一族产品,即相同产品族的产品是一起被使用的
- 当系统需要新增一个产品族时,只需要增加新的工厂类即可,无需修改源代码;但是如果需要产品族中增加一个新种类的产品时,则所有的工厂类都需要修改
- 组成角色
- 抽象工厂: 提供了创建产品的接口,包含多个创建产品的方法,即包含多个类似创建产品的方法
- 具体工厂: 实现抽象工厂定义的接口,完成某个具体产品的创建
- 抽象产品: 抽象产品定义,一般有多少抽象产品,抽象工厂中就包含多少个创建产品的方法
- 具体产品: 抽象产品的实现类
1
2
3
4
5
6
7
8
9
10
11
12
13
14
15
16
17
18
19
20
21
22
23
24
25
26
27
28
29
30
31
32
33
34
35
36
37
38
39
40
41
42
43
44
45
46
47
48
49
50
export { };
abstract class AmericanoCoffee { }
abstract class LatteCoffee { }
abstract class CappuccinoCoffee { }

class StarbucksAmericanoCoffee extends AmericanoCoffee { }
class StarbucksLatteCoffee extends LatteCoffee { }
class StarbucksCappuccinoCoffee extends CappuccinoCoffee { }

class LuckinAmericanoCoffee extends AmericanoCoffee { }
class LuckinLatteCoffee extends LatteCoffee { }
class LuckinCappuccinoCoffee extends CappuccinoCoffee { }

abstract class CafeFactory {
  abstract createAmericanoCoffee(): AmericanoCoffee;
  abstract createLatteCoffee(): LatteCoffee;
  abstract createCappuccinoCoffee(): CappuccinoCoffee;
}
class StarbucksCafeFactory extends CafeFactory {
  createAmericanoCoffee() {
    return new StarbucksAmericanoCoffee();
  }
  createLatteCoffee() {
    return new StarbucksLatteCoffee();
  }
  createCappuccinoCoffee() {
    return new StarbucksCappuccinoCoffee();
  }
}
class LuckinCafeFactory extends CafeFactory {
  createAmericanoCoffee() {
    return new LuckinAmericanoCoffee();
  }
  createLatteCoffee() {
    return new LuckinLatteCoffee();
  }
  createCappuccinoCoffee() {
    return new LuckinCappuccinoCoffee();
  }
}

let starbucksCafeFactory = new StarbucksCafeFactory();
console.log(starbucksCafeFactory.createAmericanoCoffee());
console.log(starbucksCafeFactory.createCappuccinoCoffee());
console.log(starbucksCafeFactory.createLatteCoffee());

let luckinCafeFactory = new LuckinCafeFactory();
console.log(luckinCafeFactory.createAmericanoCoffee());
console.log(luckinCafeFactory.createCappuccinoCoffee());
console.log(luckinCafeFactory.createLatteCoffee());
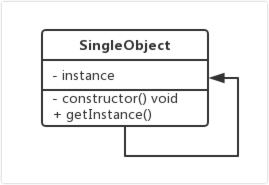
4. 单例模式
1
2
3
4
5
6
7
8
9
10
11
12
13
14
15
16
// 单例模式
export { };
class Window {
  private static instance: Window;
  private constructor() { }
  static getInstance() {
    if (!Window.instance) {
      Window.instance = new Window();
    }
    return Window.instance;
  }
}
//new Window();
var w1 = Window.getInstance();
var w2 = Window.getInstance();
console.log(w1 === w2);
1
2
3
4
5
6
7
8
9
10
11
12
13
14
15
16
17
18
19
20
21
22
23
24
25
// 单例与构建分离
export { }
interface Window {
  hello: any
}
function Window() {
}
Window.prototype.hello = function () {
  console.log('hello');
}

let createInstance = (function () {
  let instance: Window;
  return function () {
    if (!instance) {
      instance = new (Window as any)();
    }
    return instance;
  }
})();

let window1 = createInstance();
let window2 = createInstance();
window1.hello();
console.log(window1 === window2)
1
2
3
4
5
6
7
8
9
10
11
12
13
14
15
16
17
18
19
20
21
22
23
// 封装变化
export {};
function Window() {}
Window.prototype.hello = function () {
  console.log('hello');
};

let createInstance = function (Constructor: any) {
  let instance: any;
  return function (this: any) {
    if (!instance) {
      Constructor.apply(this, arguments);
      Object.setPrototypeOf(this, Constructor.prototype);
      instance = this;
    }
    return instance;
  };
};
let CreateWindow: any = createInstance(Window);
let window1 = new CreateWindow();
let window2 = new CreateWindow();
window1.hello();
console.log(window1 === window2);
使用场景
1
2
3
4
5
6
7
8
9
10
11
12
13
14
15
16
17
18
19
20
21
22
23
24
25
26
27
28
29
30
31
32
33
34
35
36
37
38
39
40
41
42
43
44
45
46
47
48
49
50
51
52
53
54
55
// 模态窗口
<!DOCTYPE html>
<html lang="en">
  <head>
    <meta charset="UTF-8" />
    <meta name="viewport" content="width=device-width, initial-scale=1.0" />
    <meta http-equiv="X-UA-Compatible" content="ie=edge" />
    <title>Document</title>
  </head>

  <body>
    <button id="show-button">显示模态窗口</button>
    <button id="hide-button">隐藏模态窗口</button>
    <script>
      class Login {
        constructor() {
          this.element = document.createElement('div');
          this.element.innerHTML = `
            用户名 <input type="text"/>
            <button>登录</button>
            `;
          this.element.style.cssText =
            'width: 100px; height: 100px; position: absolute; left: 50%; top: 50%; display: block;';
          document.body.appendChild(this.element);
        }
        show() {
          this.element.style.display = 'block';
        }
        hide() {
          this.element.style.display = 'none';
        }
      }
      Login.getInstance = (function () {
        let instance;
        return function () {
          if (!instance) {
            instance = new Login();
          }
          return instance;
        };
      })();

      document
        .getElementById('show-button')
        .addEventListener('click', function (event) {
          Login.getInstance().show();
        });
      document
        .getElementById('hide-button')
        .addEventListener('click', function (event) {
          Login.getInstance().hide();
        });
    </script>
  </body>
</html>
1
2
3
4
5
6
7
8
9
10
11
12
13
14
15
16
17
18
19
20
21
22
23
24
25
26
// store
function createStore(reducer: any) {
  let state: any;
  let listeners: any[] = [];
  function getState() {
    return state;
  }
  function dispatch(action: any) {
    state = reducer(state, action);
    listeners.forEach((l) => l());
  }
  function subscribe(listener: any) {
    listeners.push(listener);
    return () => {
      listeners = listeners.filter((item) => item != listener);
      console.log(listeners);
    };
  }
  dispatch({});
  return {
    getState,
    dispatch,
    subscribe,
  };
}
let store = createStore((state: any, action: any) => state);
1
2
3
4
5
6
7
8
9
10
11
12
13
14
15
16
17
18
19
// 缓存
let express = require('express');
let fs = require('fs');
let cache: Record<any, any> = {};
let app = express();
app.get('/user/:id', function (req: any, res: any) {
  let id = req.params.id;
  let user = cache.get(id);
  if (user) {
    res.json(user);
  } else {
    fs.readFile(`./users/${id}.json`, 'utf8', function (err: any, data: any) {
      let user = JSON.parse(data);
      cache.put(id, user);
      res.json(user);
    });
  }
});
app.listen(3000);
5. 适配器模式
适配器模式又称包装器模式,将一个类的接口转化为用户需要的另一个接口,解决类(对象)之间接口不兼容的问题
- 旧的接口和使用者不兼容
- 中间加一个适配器转换接口

1
2
3
4
5
6
7
8
9
10
11
12
13
14
15
16
17
18
19
20
class Socket {
  output() {
    return '输出220V';
  }
}

abstract class Power {
  abstract charge(): string;
}
class PowerAdapter extends Power {
  constructor(public socket: Socket) {
    super();
  }
  //转换后的接口和转换前不一样
  charge() {
    return this.socket.output() + ' 经过转换 输出24V';
  }
}
let powerAdapter = new PowerAdapter(new Socket());
console.log(powerAdapter.charge());
使用场景
1
2
3
4
5
6
7
8
9
10
11
12
13
14
15
16
17
18
19
20
21
22
23
24
25
26
27
28
29
30
31
32
33
34
35
36
37
38
39
40
41
42
43
44
45
46
47
48
49
50
51
52
53
54
55
56
57
58
59
60
61
62
63
64
65
66
67
68
69
70
71
72
73
74
75
76
77
// toAxiosAdapter
function toAxiosAdapter(options: any) {
  return axios({
    url: options.url,
    method: options.type
  }).then(options.success)
    .catch(options.error)
}


$.ajax = function (options: any) {
  return toAxiosAdapter(options)
}

$.ajax({
  url: '/api/user',
  type: 'GET',
  success: function (data: any) {
    console.log(data)
  },
  error: function (err: any) {
    console.error(err);
  }
})

// promisify
let fs = require('fs');
var Bluebird = require("bluebird");
let readFile = Bluebird.promisify(fs.readFile);

(async function () {
  let content = await readFile('./1.txt', 'utf8');
  console.log(content);
})()
function promisify(readFile: any) {
  return function (filename: any, encoding: any) {
    return new Promise(function (resolve, reject) {
      readFile(filename, encoding, function (err: any, data: any) {
        if (err)
          reject(err);
        else
          resolve(data);
      })
    });
  }
}

// computed
<!DOCTYPE html>
<html lang="en">
<head>
    <meta charset="UTF-8">
    <meta name="viewport" content="width=device-width, initial-scale=1.0">
    <meta http-equiv="X-UA-Compatible" content="ie=edge">
    <script src="https://cdn.bootcss.com/vue/2.5.17/vue.js"></script>
    <title>vue</title>
</head>
<body>
<div id="root">
<p></p>
<p></p>
</div>
<script>
let vm=new Vue({
    el: '#root',
    data: {
        name:'pf'
    },
    computed: {
        upperName() {
            return this.name.toUpperCase();
        }
    }
});
</script>
</body>
</html>
6. 装饰器模式
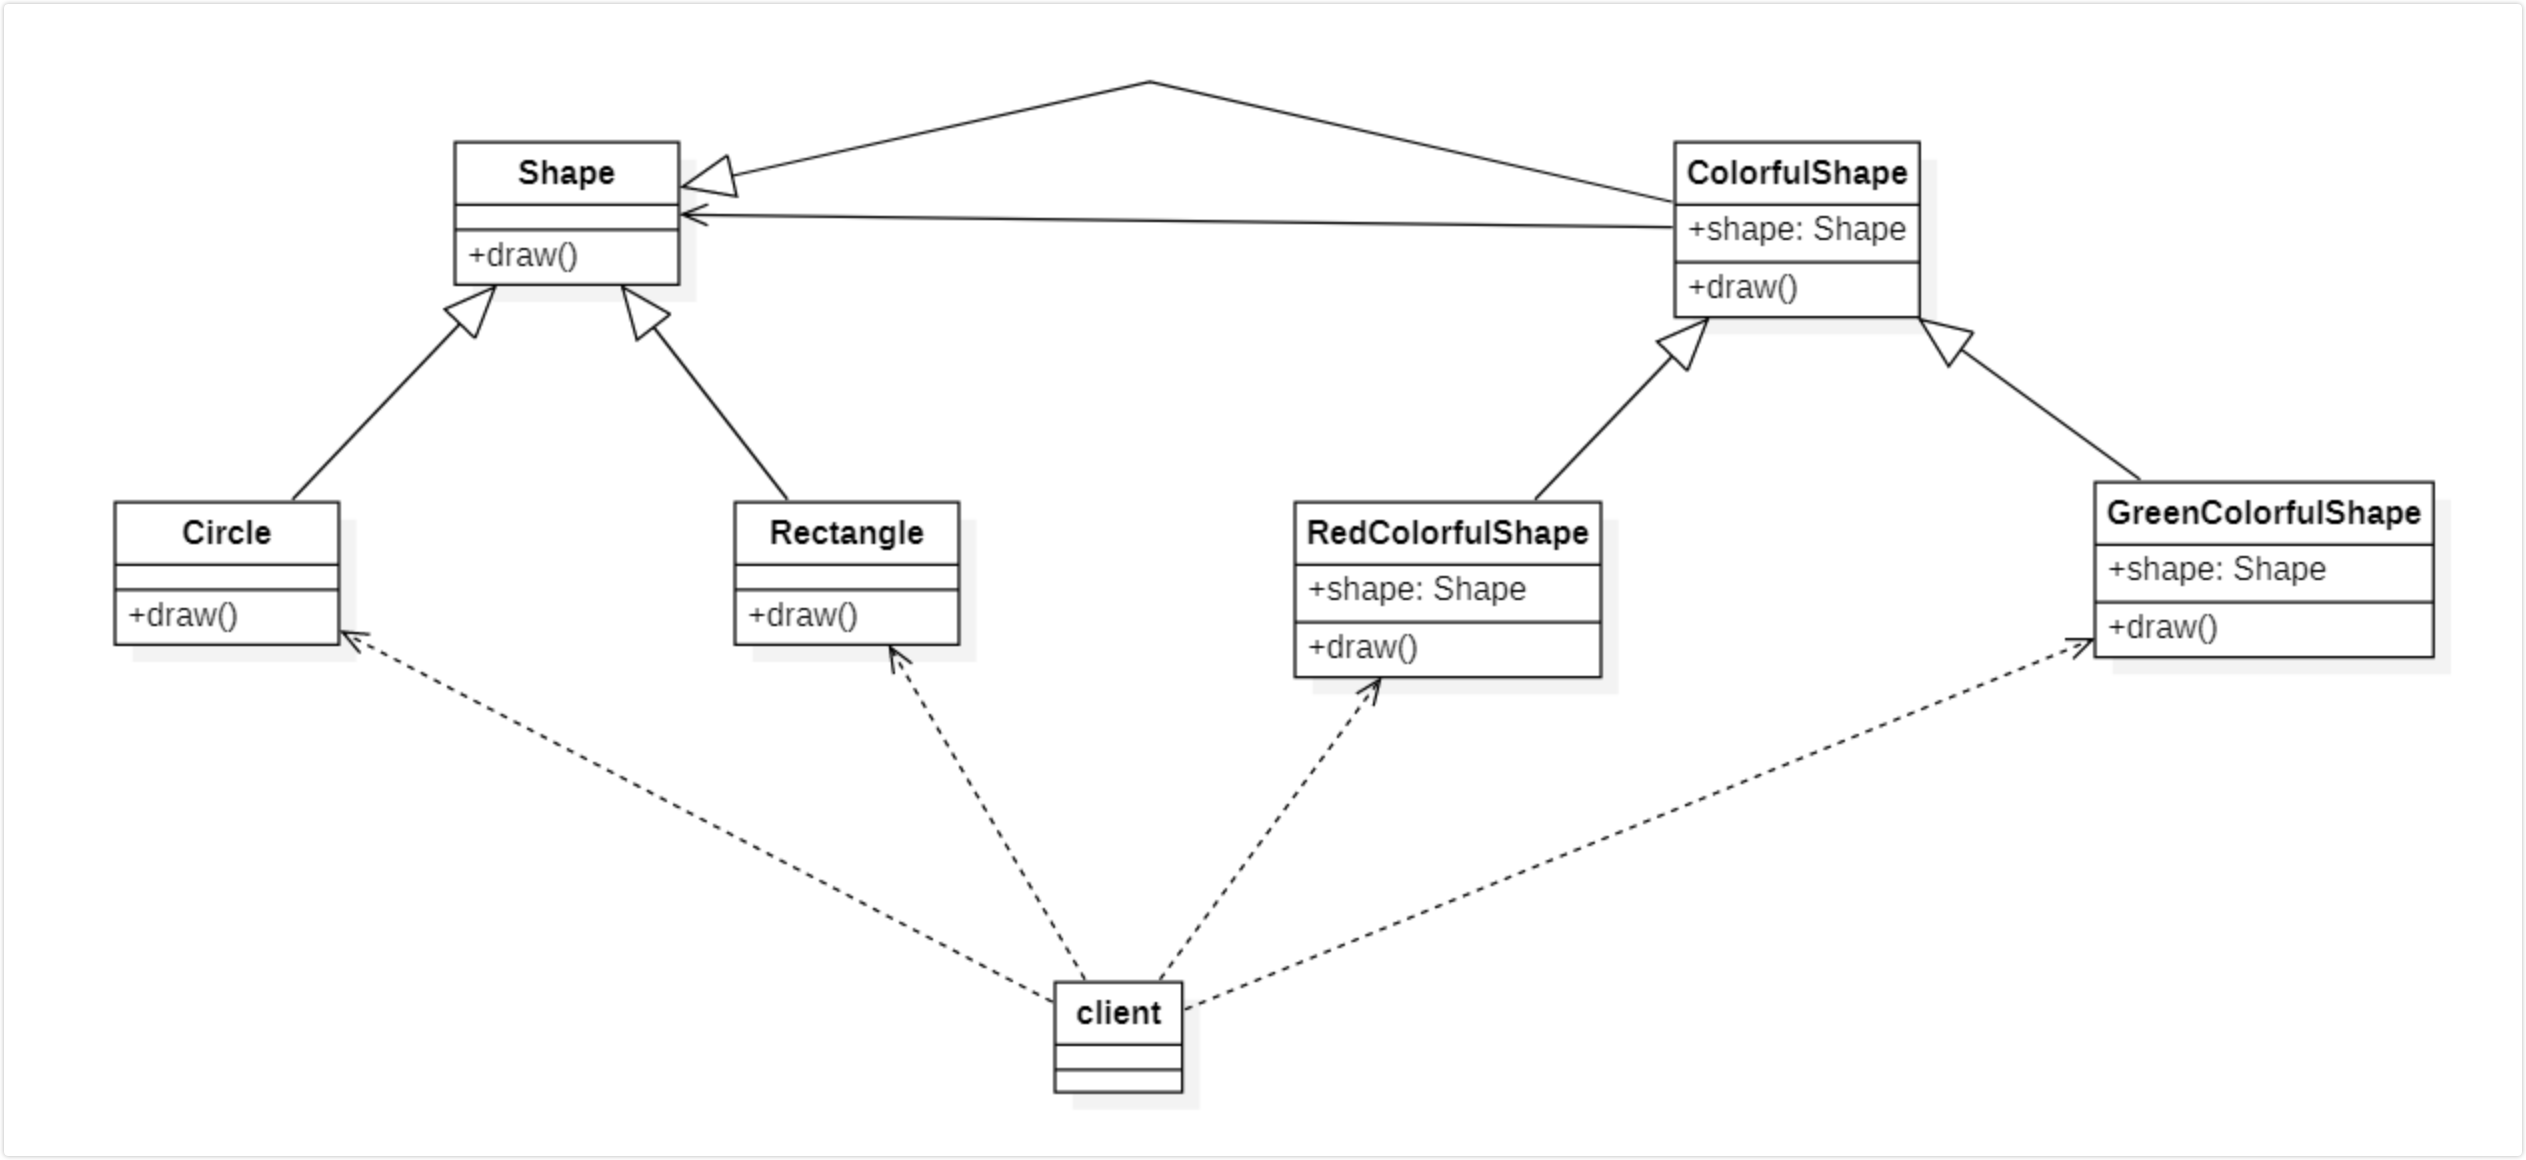
在不改变其原有的结构和功能为对象添加新功能的模式其实就叫做装饰器模式
- 最直观地就是我们买房后的装修
- 装饰比继承更加灵活,可以实现装饰者和被装饰者之间松耦合
- 被装饰者可以使用装饰者动态地增加和撤销功能
1
2
3
4
5
6
7
8
9
10
11
12
13
14
15
16
17
18
19
20
21
22
23
24
25
26
27
28
29
30
31
32
33
34
35
36
37
38
39
40
41
abstract class Shape {
  abstract draw(): void;
}
class Circle extends Shape {
  draw() {
    console.log('绘制圆形');
  }
}
class Rectangle extends Shape {
  draw() {
    console.log('绘制矩形');
  }
}

abstract class ColorfulShape extends Shape {
  public constructor(public shape: Shape) {
    super();
  }
  abstract draw(): void;
}

class RedColorfulShape extends ColorfulShape {
  draw() {
    this.shape.draw();
    console.log('把边框涂成红色');
  }
}
class GreenColorfulShape extends ColorfulShape {
  draw() {
    this.shape.draw();
    console.log('把边框涂成绿色');
  }
}

let circle = new Circle();
let redColorfulShape = new RedColorfulShape(circle);
redColorfulShape.draw();

let rectangle = new Rectangle();
let greenColorfulShape = new GreenColorfulShape(rectangle);
greenColorfulShape.draw();
使用场景:
装饰器是一种特殊类型的声明,它能够被附加到类声明、方法、属性或参数上,可以修改类的行为。常见的装饰器有类装饰器、属性装饰器、方法装饰器和参数装饰器。AOP面向切片编程:可以通过预编译方式和运行期动态代理实现在不修改源代码的情况下给程序动态统一添加功能的一种技术。埋点:是网站分析的一种常用的数据采集方法,无痕埋点: 通过技术手段,完成对用户行为数据无差别的统计上传的工作,后期数据分析处理的时候通过技术手段筛选出合适的数据进行统计分析。
1
2
3
4
5
6
7
8
9
10
11
12
13
14
15
16
17
18
19
20
21
22
23
24
25
26
27
28
29
30
31
32
33
34
35
36
37
38
39
40
41
42
43
44
45
46
47
48
49
50
51
52
53
54
55
56
57
58
59
60
61
62
63
64
65
66
67
68
69
70
71
72
73
74
75
76
77
78
// 类装饰器:在类声明之前声明,用来监控、修改或替换类定义
namespace decorator_factory {
  interface Animal {
    swings: string;
    fly: any
  }
  function flyable(swings: number) {
    return function flyable(target: any) {
      console.log(target);

      target.prototype.swings = swings;
      target.prototype.fly = function () {
        console.log('I can fly');
      }
    }
  }

  @flyable(2)
  class Animal {
    constructor() { }
  }
  let animal: Animal = new Animal();
  console.log(animal.swings);
  animal.fly();
}

// 属性装饰器:表达式会在运行时当作函数被调用
namespace property_namespace {
    //实例属性target是类的原型对象,key是属性名称
    function instancePropertyDecorator(target: any, key: string) {
    }
    //类属性target是的构造函数
    function classPropertyDecorator(target: any, key: string) {
    }
    //实例方法装饰器target是原型对象,key方法名,descriptor是方法描述符
    function instanceMethodDecorator(target: any, key: string, descriptor: PropertyDescriptor) {
    }
    //类方法装饰器target是类的构造函数
    function classMethodDecorator(target: any, key: string, descriptor: PropertyDescriptor) {
    }
    class Person {
        @instancePropertyDecorator
        instanceProperty: string;
        @classPropertyDecorator
        public static classProperty: string;
        @instanceMethodDecorator
        instanceMethod() {
            console.log('instanceMethod');
        }
        @classMethodDecorator
        classMethod() {
            console.log('classMethod');
        }
    }
}

//core-decorator
let { readonly } = require('core-decorators');
function deprecate(msg: string, options: any) {
  return function (target: any, attr: any, descriptor: any) {
    //DEPRECATION Calculator#add: This function will be removed in future versions.
    let oldVal = descriptor.value;
    descriptor.value = function (...args: any[]) {
      let message = msg ? msg : `DEPRECATION ${target.constructor.name}#${attr}: This function will be removed in future versions.`;
      let see = options && options.url ? `see ${options.url}` : ``;
      console.warn(message + '\r\n' + see);
      return oldVal(...args);
    }
  }
}
class Calculator {
  @deprecate('stop using this', { url: 'http://www.baidu.com' })
  add(a: number, b: number) {
    return a + b;
  }
}
let calculator = new Calculator();
calculator.add(1, 2);
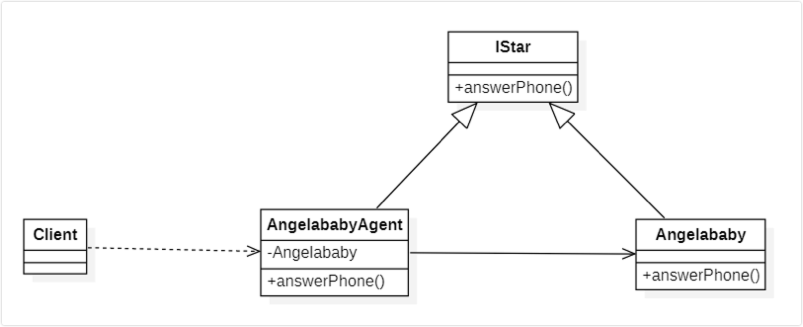
7. 代理模式
- 由于一个对象不能直接引用另外一个对象,所以需要通过代理对象在这两个对象之间起到中介作用
- 代理模式就是为目标对象创造一个代理对象,以实现对目标对象的访问
- 这样就可以在代理对象里增加一些逻辑判断、调用前或调用后执行一些操作,从而实现了扩展目标的功能
- 火车票代购、房产中介、律师、海外代购、明星经纪人
- Target 目标对象,也就是被代理的对象,是具体业务的执行者
- Proxy 代理对象,里面会包含一个目标对象的引用,可以实现对访问的扩展和额外处理
1
2
3
4
5
6
7
8
9
10
11
12
13
14
15
16
17
18
19
20
21
22
23
abstract class Star {
  abstract answerPhone(): void;
}

class Angelababy extends Star {
  public available: boolean = true;
answerPhone(): void {
  console.log('你好,我是Angelababy.');
}
}
class AngelababyAgent extends Star {
  constructor(private angelababy: Angelababy) {
    super();
  }
  answerPhone(): void {
    console.log('你好,我是Angelababy的经纪人.');
    if (this.angelababy.available) {
      this.angelababy.answerPhone();
    }
  }
}
let angelababyAgent = new AngelababyAgent(new Angelababy());
angelababyAgent.answerPhone();
使用场景
-
事件委托代理
-
事件捕获指的是从 document 到触发事件的那个节点,即自上而下的去触发事件
-
事件冒泡是自下而上的去触发事件
-
绑定事件方法的第三个参数,就是控制事件触发顺序是否为事件捕获。true 为事件捕获;false 为事件冒泡,默认 false。
1
2
3
4
5
6
7
8
9
10
11
12
13
<body>
  <ul id="list">
    <li>1</li>
    <li>2</li>
    <li>3</li>
  </ul>
  <script>
    let list = document.querySelector('#list');
    list.addEventListener('click', (event) => {
      alert(event.target.innerHTML);
    });
  </script>
</body>
-
-
节流:为了减少频繁触发事件回调
1
2
3
4
5
6
7
8
9
10
11
12
13
14
15
16
17
18
19
20
21
22
23
24
25
26
27
28
29
30
31
32
33
34
35
36
37
38
39
40
41
42
43
44
45
46
47
48
49
50
51
52
53
54
<!DOCTYPE html>
<html lang="en">

<head>
    <meta charset="UTF-8">
    <meta name="viewport" content="width=device-width, initial-scale=1.0">
    <meta http-equiv="X-UA-Compatible" content="ie=edge">
    <title>Document</title>
    <style>
        #container {
            width: 200px;
            height: 400px;
            border: 1px solid red;
            overflow: auto;
        }

        #container .content {
            height: 4000px;
        }
    </style>
</head>

<body>
    <div id="container">
        <div class="content"></div>
    </div>
    <script>
        function throttle(callback, interval) {
            let last;
            return function () {
                let context = this;
                let args = arguments;
                let now = Date.now();
                if (last) {
                    if (now - last >= interval) {
                        last = now;
                        callback.apply(context, args);
                    }
                } else {
                    callback.apply(context, args);
                    last = now;
                }

            }
        }
        let lastTime = Date.now();
        const throttle_scroll = throttle(() => {
            console.log('触发了滚动事件', (Date.now() - lastTime) / 1000);
        }, 1000);
        document.getElementById('container').addEventListener('scroll', throttle_scroll);
    </script>
</body>

</html>
-
防抖:通过防抖代理优化可以把多次请求合并为一次,提高性能
1
2
3
4
5
6
7
8
9
10
11
12
13
14
15
16
17
18
19
20
21
22
23
24
25
26
27
28
29
30
31
32
33
34
35
36
37
38
39
40
41
42
43
44
45
46
47
<!DOCTYPE html>
<html lang="en">
  <head>
    <meta charset="UTF-8" />
    <meta name="viewport" content="width=device-width, initial-scale=1.0" />
    <meta http-equiv="X-UA-Compatible" content="ie=edge" />
    <title>Document</title>
    <style>
      #container {
        width: 200px;
        height: 400px;
        border: 1px solid red;
        overflow: auto;
      }

      #container .content {
        height: 4000px;
      }
    </style>
  </head>

  <body>
    <div id="container">
      <div class="content"></div>
    </div>
    <script>
      function throttle(callback, delay) {
        let timer;
        return function () {
          let context = this;
          let args = arguments;
          if (timer) clearTimeout(timer);
          timer = setTimeout(() => {
            callback.apply(context, args);
          }, delay);
        };
      }
      let lastTime = Date.now();
      const throttle_scroll = throttle(() => {
        console.log('触发了滚动事件', (Date.now() - lastTime) / 1000);
      }, 1000);
      document
        .getElementById('container')
        .addEventListener('scroll', throttle_scroll);
    </script>
  </body>
</html>
-
代理跨域
-
nginx 代理跨域
-
webpack-dev-server代理跨域 -
客户端代理跨域
-
当前的服务启动在 origin(3000 端口)上,但是调用的接口在 target(4000 端口)上
-
postMessage
方法可以安全地实现跨源通信
otherWindow:其他窗口的一个引用 message:将要发送到其他 window 的数据message将要发送到其他 window 的数据targetOrigin通过窗口的 origin 属性来指定哪些窗口能接收到消息事件,其值可以是字符串”*“(表示无限制)或者一个 URI- data 从其他
window中传递过来的对象 - origin 调用
postMessage时消息发送方窗口的origin - source 对发送消息的窗口对象的引用
-
-
Proxy:修改某些操作的默认行为
1
2
3
4
5
6
7
8
9
10
11
12
13
14
15
16
17
18
19
20
21
22
23
24
25
26
27
28
29
30
31
32
33
34
let wang = {
  name: 'wanglaoshi',
  age: 29,
  height: 165,
};
let wangMama = new Proxy(wang, {
  get(target, key) {
    if (key == 'age') {
      return wang.age - 1;
    } else if (key == 'height') {
      return wang.height - 5;
    }
    return target[key];
  },
  set(target, key, val) {
    if (key == 'boyfriend') {
      let boyfriend = val;
      if (boyfriend.age > 40) {
        throw new Error('太老');
      } else if (boyfriend.salary < 20000) {
        throw new Error('太穷');
      } else {
        target[key] = val;
        return true;
      }
    }
  },
});
console.log(wangMama.age);
console.log(wangMama.height);
wangMama.boyfriend = {
  age: 41,
  salary: 3000,
};
-
Vue2 和 Vue3
- Vue2 中的变化侦测实现对 Object 及 Array 分别进行了不同的处理,Object 使用了
Object.defineProperty API,Array使用了拦截器对Array原型上的能够改变数据的方法进行拦截。虽然也实现了数据的变化侦测,但存在很多局限 ,比如对象新增属性无法被侦测,以及通过数组下边修改数组内容,也因此在 Vue2 中经常会使用到$set这个方法对数据修改,以保证依赖更新。 - Vue3 中使用了 es6 的
Proxy API对数据代理,没有像Vue2中对原数据进行修改,只是加了代理包装,因此首先性能上会有所改善。其次解决了Vue2中变化侦测的局限性,可以不使用$set新增的对象属性及通过下标修改数组都能被侦测到。
- Vue2 中的变化侦测实现对 Object 及 Array 分别进行了不同的处理,Object 使用了
对比
- 代理模式 VS 适配器模式 适配器提供不同接口,代理模式提供一模一样的接口
- 代理模式 VS 装饰器模式 装饰器模式原来的功能不变还可以使用,代理模式改变原来的功能
8. 观察者模式
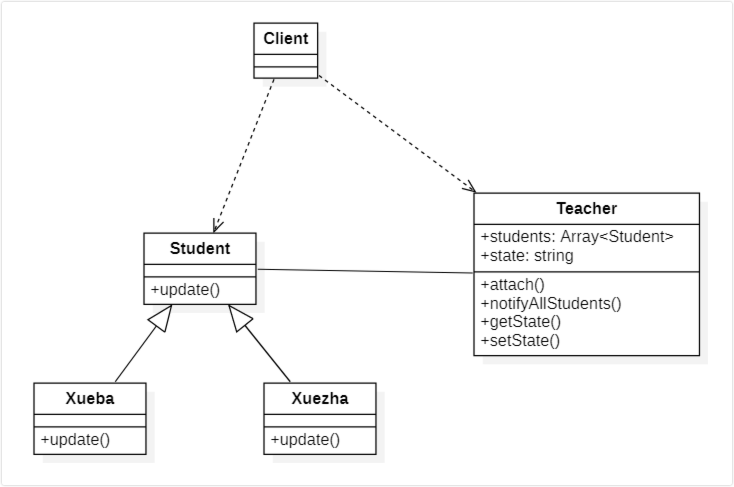
观察者模式定义了一种一对多的依赖关系,让多个观察者对象同时监听某一个目标对象,当这个目标对象的状态发生变化时,会通知所有观察者对象,使它们能够自动更新
- 主体对象(Subject)又称为被观察者,可以增加和删除观察者对象,它将有关状态存入具体观察者对象,再具体主体的内部状态改变时,给所有登记过(关联了观察关系)的观察者发出通知。
- 观察者(Objserver)角色:定义一个接受通知的接口(update),在得到主体通知时更新自己。
1
2
3
4
5
6
7
8
9
10
11
12
13
14
15
16
17
18
19
20
21
22
23
24
25
26
27
28
29
30
31
32
33
34
35
36
abstract class Student {
    constructor(public teacher: Teacher) { }
    public abstract update();
}
class Xueba extends Student {
    public update() {
        console.log(this.teacher.getState() + ',学霸抬头举手');
    }
}
class Xuezha extends Student {
    public update() {
        console.log(this.teacher.getState() + ',学渣低头祈祷');
    }
}

class Teacher {
    private students: Student[] = new Array<Student>();
    public state: string = '老师讲课'
    getState() {
        return this.state;
    }
    public askQuestion() {
        this.state = '老师提问';
        this.notifyAllStudents();
    }
    attach(student: Student) {
        this.students.push(student);
    }
    notifyAllStudents() {
        this.students.forEach(student => student.update());
    }
}
let teacher = new Teacher();
teacher.attach(new Xueba(teacher));
teacher.attach(new Xueza(teacher));
teacher.askQuestion();
使用场景
1
2
3
4
5
6
7
8
9
10
11
12
13
14
15
16
17
18
19
20
21
22
23
24
25
26
27
28
29
// DOM事件绑定
<!DOCTYPE html>
<html lang="en">
  <head>
    <meta charset="UTF-8" />
    <meta name="viewport" content="width=device-width, initial-scale=1.0" />
    <meta http-equiv="X-UA-Compatible" content="ie=edge" />
    <title>观察者模式</title>
  </head>

  <body>
    <button id="btn">click</button>
    <script>
      let btn = document.getElementById('btn');
      const handler1 = () => {
        console.log(1);
      };
      const handler2 = () => {
        console.log(2);
      };
      const handler3 = () => {
        console.log(3);
      };
      btn.addEventListener('click', handler1);
      btn.addEventListener('click', handler2);
      btn.addEventListener('click', handler3);
    </script>
  </body>
</html>
1
2
3
4
5
6
7
8
9
10
11
12
13
14
15
16
17
18
19
20
// Promise
class Promise {
    private callbacks: Array<Function> = []
    constructor(fn) {
        let resolve = () => {
            this.callbacks.forEach(callback => callback())
        };
        fn(resolve);
    }
    then(callback) {
        this.callbacks.push(callback);
    }
}
let promise = new Promise(function (resolve) {
    setTimeout(function () {
        resolve(100);
    }, 1000);
});
promise.then(() => console.log(1));
promise.then(() => console.log(2));
1
2
3
4
5
6
7
8
9
10
11
12
13
14
15
16
17
18
19
20
21
22
23
24
25
26
27
28
29
30
31
// EventEmitter
const EventEmitter = require('events');
let subject = new EventEmitter();
subject.on('click', function (name) {
  console.log(1, name);
});
subject.on('click', function (name) {
  console.log(2, name);
});
subject.emit('click', 'pf');

// events.js
class EventEmitter {
  constructor() {
    this._events = {};
  }
  on(type, listener) {
    let listeners = this._events[type];
    if (listeners) {
      listeners.push(listener);
    } else {
      this._events[type] = [listener];
    }
  }
  emit(type) {
    let listeners = this._events[type];
    let args = Array.from(arguments).slice(1);
    listeners.forEach((listener) => listener(...args));
  }
}
module.exports = EventEmitter;
1
2
3
4
5
6
7
8
9
10
11
12
13
14
15
16
17
18
19
20
21
22
23
24
25
// EventBus

// EventBus.js
import Vue from 'vue';
export default new Vue();

// 组件A
import EventBus from './EventBus';
EventBus.$on("customEvent", name => {
    console.log(name);
})

// 组件B
import EventBus from './EventBus';
EventBus.$emit("customEvent", 'pf')
<body>
    <script src="https://cdn.bootcss.com/vue/2.5.17/vue.js"></script>
    <script>
        let EventBus = new Vue();
        EventBus.$on("customEvent", name => {
            console.log(name);
        })
        EventBus.$emit("customEvent", 'pf')
    </script>
</body>
1
2
3
4
5
6
7
8
9
10
11
12
13
14
15
16
17
18
19
20
21
22
23
24
25
26
27
28
29
30
31
32
33
34
35
36
37
38
39
40
41
42
43
44
45
46
47
48
49
50
51
52
53
54
55
56
57
58
59
60
61
62
63
64
65
// Vue响应式 // 在 Vue 中,每个组件实例都有相应的 `watcher`
实例对象,它会在组件渲染的过程中把属性记录为依赖,之后当依赖项的 `setter`
被调用时,会通知 `watcher` 重新计算,从而致使它关联的组件得以更新
<!DOCTYPE html>
<html lang="en">
  <head>
    <meta charset="UTF-8" />
    <meta name="viewport" content="width=device-width, initial-scale=1.0" />
    <meta http-equiv="X-UA-Compatible" content="ie=edge" />
    <title>vue</title>
  </head>

  <body>
    <div id="name"></div>
    <div id="age"></div>
    <script>
      let name = document.getElementById('name');
      let age = document.getElementById('age');
      class Dep {
        subs = [];
        addSub(sub) {
          this.subs.push(sub);
        }
        notify() {
          this.subs.forEach((sub) => sub());
        }
      }
      function observe(target) {
        Object.keys(target).forEach((key) => {
          let val = target[key];
          const dep = new Dep();
          if (key == 'name') {
            name.innerHTML = val;
            dep.addSub(() => {
              name.innerHTML = val;
            });
          } else if (key == 'age') {
            age.innerHTML = val;
            dep.addSub(() => {
              age.innerHTML = val;
            });
          }
          Object.defineProperty(target, key, {
            get: function () {
              return val;
            },
            set: function (value) {
              val = value;
              dep.notify();
            },
          });
        });
      }

      let obj = { name: '名称', age: '年龄' };
      observe(obj);
      setTimeout(() => {
        obj.name = '新名称';
      }, 3000);
      setTimeout(() => {
        obj.age = '新年龄';
      }, 6000);
    </script>
  </body>
</html>
-
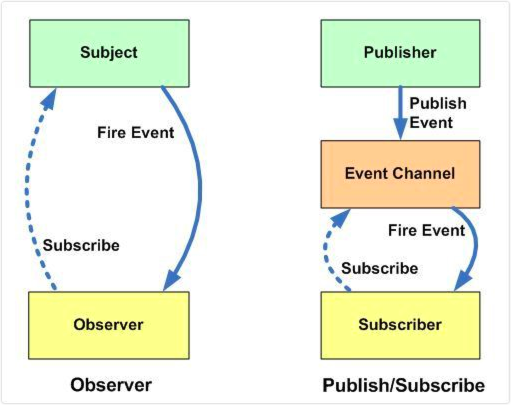
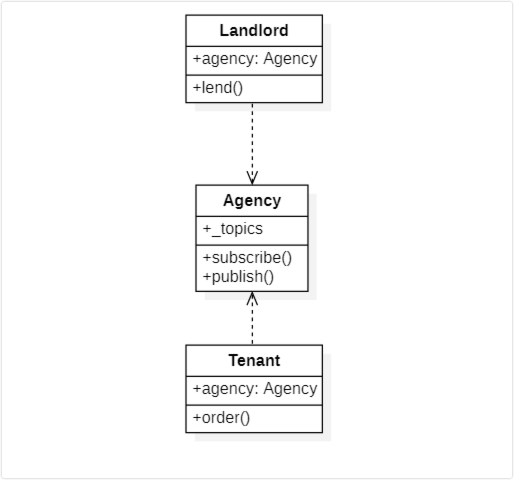
发布订阅模式
- 订阅者把自己想订阅的事件注册到调度中心
- 当该事件触发时候,发布者发布该事件到调度中心,由调度中心统一调度订阅者注册到调度中心的处理代码。
- 虽然两种模式都存在订阅者和发布者(观察者可认为是订阅者、被观察者可认为是发布者)
- 但是观察者模式是由被观察者调度的,而发布/订阅模式是统一由调度中心调的
- 所以观察者模式的订阅者与发布者之间是存在依赖的,而发布/订阅模式则不会。
1
2
3
4
5
6
7
8
9
10
11
12
13
14
15
16
17
18
19
20
21
22
23
24
25
26
27
28
29
30
31
32
33
34
35
36
37
38
class Agency {
  _topics = {}
  subscribe(topic, listener) {
    let listeners = this._topics[topic];
    if (listeners) {
      listeners.push(listener);
    } else {
      this._topics[topic] = [listener];
    }
  }
  publish(topic, ...args) {
    let listeners = this._topics[topic] || [];
    listeners.forEach(listener => listener(...args));
  }
}
class Landlord {
  constructor(public agent: Agency) { }
  lend(topic, area, money) {
    this.agent.publish(topic, area, money);
  }
}

class Tenant {
  constructor(public agent: Agency, public name: string) { }
  order(topic) {
    this.agent.subscribe(topic, (area, money) => {
      console.log(this.name, `${area}平米, ${money}元`);
    });
  }
}
let agent = new Agency();
let rich = new Tenant(agent, '大款');
let poor = new Tenant(agent, '北漂');
let landlord = new Landlord(agent);
rich.order('豪宅');
poor.order('单间');
landlord.lend('豪宅', 10000, 1000000);
landlord.lend('单间', 10, 1000);
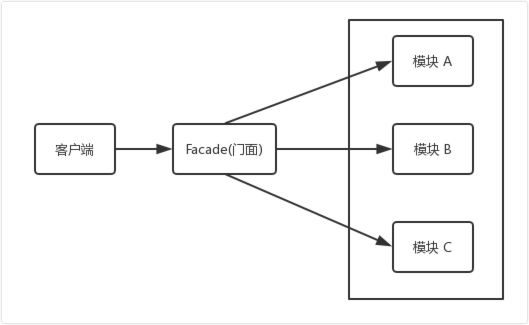
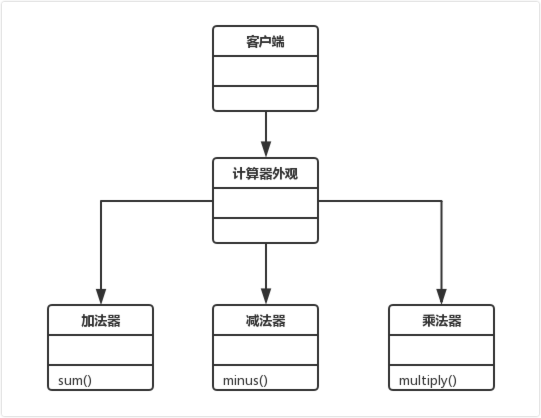
9. 外观模式
外观模式(Facade Pattern)又叫门面模式,定义一个将子系统的一组接口集成在一起的高层接口,以提供一个一致的外观
- 外观模式让外界减少与子系统内多个模块的直接交互,从而减少耦合,让外界可以更轻松地使用子系统
- 该设计模式由以下角色组成
- 门面角色:外观模式的核心。它被客户角色调用,它熟悉子系统的功能。内部根据客户角色的需求预定了几种功能的组合
- 子系统角色:实现了子系统的功能。它对客户角色和
Facade是未知的- 客户角色:通过调用 Facede 来完成要实现的功能
- 遥控器、自动驾驶汽车、房屋中介
1
2
3
4
5
6
7
8
9
10
11
12
13
14
15
16
17
18
19
20
21
22
23
24
25
26
27
28
29
30
31
32
33
34
35
36
37
38
class Sum {
  sum(a, b) {
    return a + b;
  }
}
class Minus {
  minus(a, b) {
    return a - b;
  }
}
class Multiply {
  multiply(a, b) {
    return a * b;
  }
}
class Calculator {
  sumObj;
  minusObj;
  multiplyObj;
  constructor() {
    this.sumObj = new Sum();
    this.minusObj = new Minus();
    this.multiplyObj = new Multiply();
  }
  sum(...args) {
    return this.sumObj.sum(...args);
  }
  minus(...args) {
    return this.minusObj.minus(...args);
  }
  multiply(...args) {
    return this.multiplyObj.multiply(...args);
  }
}
let calculator = new Calculator();
console.log(calculator.sum(1, 2));
console.log(calculator.minus(1, 2));
console.log(calculator.multiply(1, 2));
使用场景
1
2
3
4
5
6
7
8
9
10
11
12
13
14
15
16
17
18
19
20
21
22
23
24
25
26
27
28
29
30
31
32
33
34
35
36
37
38
39
40
41
// 压缩
export {};
var zlib = require('zlib');
var fs = require('fs');
let path = require('path');
function open(input) {
  let ext = path.extname(input);
  switch (ext) {
    case '.gz':
      return unZip(input);
    case '.rar':
      return unRar(input);
    case '.7z':
      return un7z(input);
    default:
      break;
  }
}
function unZip(src) {
  var gunzip = zlib.createGunzip();
  var inputStream = fs.createReadStream(src);
  var outputStream = fs.createWriteStream(src.slice(0, -3));
  console.log('outputStream');

  inputStream.pipe(gunzip).pipe(outputStream);
}
function unRar(src) {
  console.log('Rar解压后的', src);
}
function un7z(src) {
  console.log('7z解压后的', src);
}
open('./source.txt.gz');

function zip(src) {
  var gzip = zlib.createGzip(); //创建压缩流
  var inputStream = fs.createReadStream(src);
  var outputStream = fs.createWriteStream(src + '.gz');
  inputStream.pipe(gzip).pipe(outputStream);
}
zip('source.txt');
1
2
3
4
5
6
7
8
9
10
11
12
13
14
15
16
// vue createElement
const childrenLength = arguments.length - 2;
if (childrenLength === 1) {
  props.children = children;
} else if (childrenLength > 1) {
  const childArray = Array(childrenLength);
  for (let i = 0; i < childrenLength; i++) {
    childArray[i] = arguments[i + 2];
  }
  if (__DEV__) {
    if (Object.freeze) {
      Object.freeze(childArray);
    }
  }
  props.children = childArray;
}
1
2
3
4
5
6
7
// createStore
export default function createStore(reducer, preloadedState, enhancer) {
  if (typeof preloadedState === 'function' && typeof enhancer === 'undefined') {
    enhancer = preloadedState;
    preloadedState = undefined;
  }
}
1
2
3
4
5
6
7
8
9
10
11
12
13
// axios
function getDefaultAdapter() {
  var adapter;
  if (
    typeof process !== 'undefined' &&
    Object.prototype.toString.call(process) === '[object process]'
  ) {
    adapter = require('./adapters/http');
  } else if (typeof XMLHttpRequest !== 'undefined') {
    adapter = require('./adapters/xhr');
  }
  return adapter;
}
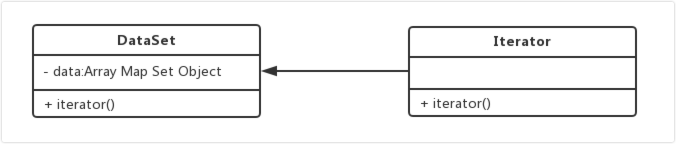
10. 迭代器模式
迭代器模式用于顺序地访问聚合对象内部的元素,又无需知道对象内部结构。使用了迭代器之后,使用者不需要关心对象的内部构造,就可以按序访问其中的每个元素。
1
2
3
4
5
6
7
8
9
10
11
12
13
14
function createIterator(arr) {
  let index = 0;
  return {
    next() {
      return index < arr.length
        ? { value: arr[index++], done: false }
        : { done: true };
    },
  };
}
let it = createIterator([1, 2]);
console.log(it.next());
console.log(it.next());
console.log(it.next());
使用场景
1
2
3
4
5
6
7
8
9
10
11
12
13
14
15
16
17
18
19
20
21
22
23
24
25
26
27
28
29
30
31
32
33
34
35
36
37
38
39
40
41
42
43
44
45
46
47
48
49
50
51
52
53
54
55
56
57
58
59
60
61
62
63
64
65
66
67
68
69
70
71
72
73
// Iterator
Array[Symbol.iterator] = function () {
  let index = 0;
  return {
    next: () => {
      return index < this.length ?
        { value: this[index++], done: false } :
      { done: true }
    }
  }
}
let arr = [1, 2];
let it = arr[Symbol.iterator]();
console.log(it.next());
console.log(it.next());
console.log(it.next());

// yield*
let generator = function* () {
  yield 1;
  yield* [2, 3];
  yield 4;
};
var iterator = generator();
console.log(iterator.next()); // { value: 1, done: false }
console.log(iterator.next()); // { value: 2, done: false }
console.log(iterator.next()); // { value: 3, done: false }
console.log(iterator.next()); // { value: 4, done: false }
console.log(iterator.next()); // { value: undefined, done: true }

// 二叉树遍历
// 二叉树是每个结点最多有两个子树的树结构。通常子树被称作左子树和右子树
// 先序遍历:根节点->左子树->右子树
// 中序遍历:左子树->根节点->右子树
// 后序遍历:左子树->右子树->根节点
class Tree {
  constructor(public left, public value, public right) {
  }
}
//['A', 'B', 'D','E', 'C', 'F','G']
function* leftOrder(tree) {
  if (tree) {
    yield tree.value;
    yield* leftOrder(tree.left);
    yield* leftOrder(tree.right);
  }
}
//['D', 'B', 'E','A', 'F', 'C','G']
function* inOrder(tree) {
  if (tree) {
    yield* inOrder(tree.left);
    yield tree.value;
    yield* inOrder(tree.right);
  }
}
//['D', 'E', 'B','F', 'G', 'C','A']
function* rightOrder(tree) {
  if (tree) {
    yield* rightOrder(tree.left);
    yield* rightOrder(tree.right);
    yield tree.value;
  }
}
function make(array) {
  if (array.length === 1) return new Tree(null, array[0], null);
  return new Tree(make(array[0]), array[1], make(array[2]));
}
let tree = make([[['D'], 'B', ['E']], 'A', [['F'], 'C', ['G']]]);
var result: any[] = [];
for (let node of rightOrder(tree)) {
  result.push(node);
}
console.log(result);
11. 状态模式
当一个对象的内部状态发生改变时,会导致其行为的改变,这看起来像是改变了对象
- 对象有自己的状态
- 不同状态下执行的逻辑不一样
- 明确状态和每个状态下执行的动作
- 用来减少
if...else子句
1
2
3
4
5
6
7
8
9
10
11
12
13
14
15
16
17
18
19
20
21
22
23
24
25
26
27
28
29
30
31
32
33
34
35
36
37
38
39
40
41
42
43
44
45
46
47
48
class Battery {
  constructor(state) {
    this.amount = 'high';
    this.state = new SuccessState();
  }
  show() {
    this.state.show();
    if (this.amount == 'high') {
      this.amount = 'middle';
      this.setState(new WarningState());
    } else if (this.amount == 'middle') {
      this.amount = 'low';
      this.setState(new DangerState());
    }
  }
  setState(state) {
    this.state = state;
  }
}
class SuccessState {
  constructor(battery) {
    this.battery = battery;
  }
  show() {
    console.log(`绿色 ${battery.amount}`);
  }
}
class WarningState {
  constructor(battery) {
    this.battery = battery;
  }
  show() {
    console.log(`黄色 ${battery.amount}`);
  }
}
class DangerState {
  constructor(battery) {
    this.battery = battery;
  }
  show() {
    console.log(`红色 ${battery.amount}`);
  }
}

let battery = new Battery();
battery.show();
battery.show();
battery.show();
使用场景
1
2
3
4
5
6
7
8
9
10
11
12
13
14
15
16
17
18
19
20
21
22
23
24
25
26
27
28
29
30
31
32
33
34
35
36
37
38
39
40
41
42
43
44
45
46
47
48
49
50
51
52
53
54
55
56
57
58
59
60
61
62
63
// 点赞
let likeState = {
  render(element) {
    element.innerHTML = '赞👍';
  },
};
let likedState = {
  render(element) {
    element.innerHTML = '取消';
  },
};
class Button {
  constructor(container) {
    this.liked = false;
    this.state = likeState;
    this.element = document.createElement('button');
    container.appendChild(this.element);
    this.render();
  }
  setState(state) {
    this.state = state;
    this.render();
  }
  render() {
    this.state.render(this.element);
  }
}
let button = new Button(document.body);
button.element.addEventListener('click', () => {
  button.setState(button.liked ? likeState : likedState);
  button.liked = !button.liked;
});

// Promise
class Promise {
  constructor(fn) {
    this.state = 'initial';
    this.successes = [];
    this.fails = [];
    let resolve = (data) => {
      this.state = 'fulfilled';
      this.successes.forEach((item) => item(data));
    };
    let reject = (error) => {
      this.state = 'failed';
      this.fails.forEach((item) => item(error));
    };
    fn(resolve, reject);
  }
  then(success, fail) {
    this.successes.push(success);
    this.fails.push(fail);
  }
}
let p = new Promise(function (resolve, reject) {
  setTimeout(function () {
    resolve(1);
  }, 1000);
});
p.then(
  (data) => console.log('成功'),
  (error) => console.error('失败')
);
12. 策略模式
将定义的一组算法封装起来,使其相互之间可以替换。封装的算法具有一定独立性,不会随客户端变化而变化。
- 避免大量的 if else 或 swith case
1
2
3
4
5
6
7
8
9
10
11
12
13
14
15
16
17
18
19
20
21
22
class Customer {
  constructor() {
    this.kinds = {
      normal: function (price) {
        return price;
      },
      member: function (price) {
        return price * 0.9;
      },
      vip: function (price) {
        return price * 0.8;
      },
    };
  }
  cost(kind, amount) {
    return this.kinds[kind](amount);
  }
}
let c = new Customer();
console.log(c.cost('normal', 100));
console.log(c.cost('member', 100));
console.log(c.cost('vip', 100));
使用场景
- 表单校验
1
2
3
4
5
6
7
8
9
10
11
12
13
14
15
16
17
18
19
20
21
22
23
24
25
26
27
28
29
30
31
32
33
34
35
36
37
38
39
40
41
42
43
44
45
46
47
48
49
50
51
52
53
54
55
56
57
58
59
60
61
62
63
64
65
66
67
68
69
70
71
72
73
74
75
76
77
78
79
80
81
82
83
84
85
86
<!DOCTYPE html>
<html lang="en">
  <head>
    <meta charset="UTF-8" />
    <meta name="viewport" content="width=device-width, initial-scale=1.0" />
    <meta http-equiv="X-UA-Compatible" content="ie=edge" />
    <title>Document</title>
  </head>
  <body>
    <form id="userform">
      用户名
      <input type="text" name="username" />
      密码
      <input type="text" name="password" />
      手机号
      <input type="text" name="mobile" />
      <input type="submit" />
    </form>
    <script>
      let Validator = (function () {
        let rules = {
          notEmpty(val, msg) {
            if (val == '') {
              return msg;
            }
          },
          minLength(val, length, msg) {
            if (val == '' || val.length < length) {
              return msg;
            }
          },
          maxLength(val, length, msg) {
            if (val == '' || val.length > length) {
              return msg;
            }
          },
          isMobile(val, msg) {
            if (!/^1\d{10}/.test(val)) {
              return msg;
            }
          },
        };
        function addRule(name, rule) {
          rules[name] = rule;
        }
        let checks = [];
        function add(element, rule) {
          checks.push(function () {
            let name = rule.shift();
            rule.unshift(element.value);
            return rules[name] && rules[name].apply(element, rule);
          });
        }
        function start() {
          for (let i = 0; i < checks.length; i++) {
            let check = checks[i];
            let msg = check();
            if (msg) {
              return msg;
            }
          }
        }
        return {
          add,
          start,
          addRule,
        };
      })();

      let form = document.getElementById('userform');
      form.onsubmit = function () {
        Validator.add(form.username, ['notEmpty', '用户名不能为空']);
        Validator.add(form.password, ['minLength', 6, '密码小于6位最少长度']);
        Validator.add(form.password, ['maxLength', 8, '密码大于8位最大长度']);
        Validator.add(form.mobile, ['isMobile', '手机号不合法']);
        let msg = Validator.start();
        if (msg) {
          alert(msg);
          return false;
        }
        alert('校验通过');
        return true;
      };
    </script>
  </body>
</html>
- 策略模式和状态模式都有上下文,有策略或者状态类,上下文把这些请求委托给这些类来执行
- 策略模式中各个类是平等的,没有关系,客户端需要知道算法主动切换,状态模式中,状态的切换和行为被封装好了,客户不需要了解细节。
13. 原型模式
原型模式是一个创建型的模式,创建基类的时候,简单差异化的属性放在构造函数中,消耗资源相同的功能放在基类原型中。
- 函数是一种对象,对象都是通过函数创建。
- 每个函数都有一个属性 prototype,prototype 的属性值是一个对象,指向这个函数本身。
- 访问一个对象的属性时,先在基本属性中查找,如果没有,再沿着proto这条链向上找,这就是原型链。
hasOwnProperty可以区分一个属性到底是自己的还是从原型中找到。
1
2
3
4
5
6
7
8
9
function Person(name) {
  this.name = name;
}
Person.prototype.getName = function () {
  console.log(this.name);
};
let p1 = new Person('张三');
let p2 = new Person('李四');
console.log(p1.getName === p2.getName);
使用场景
1
2
3
4
5
6
7
8
9
10
11
12
13
14
15
16
17
18
19
20
21
22
23
24
25
26
27
28
29
30
31
32
33
34
35
36
37
38
39
40
41
42
43
44
45
46
47
48
49
50
51
52
53
54
55
56
57
58
59
60
61
62
63
64
65
<!DOCTYPE html>
<html lang="en">
  <head>
    <meta charset="UTF-8" />
    <meta name="viewport" content="width=device-width, initial-scale=1.0" />
    <meta http-equiv="X-UA-Compatible" content="ie=edge" />
    <title>Document</title>
    <style>
      * {
        margin: 0;
        padding: 0;
      }
      canvas {
        border: 1px solid #000;
      }
    </style>
  </head>
  <body>
    <canvas id="canvas" width="1000" height="600"></canvas>
    <script>
      //随机颜色,十六进制方法;
      function getRandomColor() {
        var rand = Math.floor(Math.random() * 0xffffff).toString(16);
        if (rand.length == 6) {
          return '#' + rand;
        } else {
          return getRandomColor();
        }
      }
      let canvas = document.getElementById('canvas');
      let ctx = canvas.getContext('2d');
      let circles = [];
      function Circle(x, y, radius) {
        this.x = x;
        this.y = y;
        this.radius = radius;
        circles.push(this);
      }
      Circle.prototype.update = function () {
        this.radius--;
        if (this.radius > 0) {
          return true;
        }
      };
      Circle.prototype.render = function () {
        ctx.beginPath();
        ctx.arc(this.x, this.y, this.radius, 0, 2 * Math.PI);
        ctx.fillStyle = getRandomColor();
        ctx.fill();
      };

      let circle = new Circle(0, 0, 30);
      canvas.onmousemove = function (event) {
        circles.push(new Circle(event.clientX, event.clientY, 30));
      };
      setInterval(function () {
        ctx.clearRect(0, 0, 1000, 600);
        circles.forEach((item) => {
          item.update() && item.render();
        });
        circles = circles.filter((item) => item.radius > 0);
      }, 20);
    </script>
  </body>
</html>
14. 桥接模式
将抽象部分与他的实现部分分离,这样抽象化与实现化解耦,使他们可以独立的变化,应用场景是实现系统可能有多个角度分类,每一种角度都可能变化。
1
2
3
4
5
6
7
8
9
10
11
12
13
14
15
16
17
18
19
20
21
22
23
24
25
26
27
28
29
30
31
32
33
34
35
36
37
38
39
40
41
42
43
44
class A {
  constructor(bridge) {
    this.bridge = bridge;
  }
  go() {
    console.log(`从${this.from()}到${this.bridge.to()}`);
  }
}
class A1 extends A {
  from() {
    return 'A1';
  }
}
class A2 extends A {
  from() {
    return 'A2';
  }
}
class A3 extends A {
  from() {
    return 'A3';
  }
}
class B {
  to() {}
}
class B1 extends B {
  to() {
    return 'B1';
  }
}
class B2 extends B {
  to() {
    return 'B2';
  }
}
class B3 extends B {
  to() {
    return 'B3';
  }
}
let b = new B3();
let a = new A2(b);
a.go();
使用场景
1
2
3
4
5
6
7
8
9
10
11
12
13
14
15
16
17
18
19
20
21
22
23
24
25
26
27
28
29
30
31
32
33
34
35
36
37
38
39
40
41
42
43
44
45
46
47
// 分离变化
<!DOCTYPE html>
<html lang="en">
  <head>
    <meta charset="UTF-8" />
    <meta name="viewport" content="width=device-width, initial-scale=1.0" />
    <meta http-equiv="X-UA-Compatible" content="ie=edge" />
    <title>html</title>
    <style>
      * {
        margin: 0;
        padding: 0;
      }
      canvas {
        border: 1px solid #000;
      }
    </style>
  </head>
  <body>
    <canvas id="canvas" width="600" height="600"></canvas>
    <script>
      //形状 颜色 坐标
      function Position(x, y) {
        this.x = x;
        this.y = y;
      }

      function Color(color) {
        this.color = color;
      }

      function Ball(x, y, color) {
        this.position = new Position(x, y);
        this.color = new Color(color);
      }
      Ball.prototype.draw = function () {
        let canvas = document.getElementById('canvas');
        let ctx = canvas.getContext('2d');
        ctx.beginPath();
        ctx.arc(this.position.x, this.position.y, 100, 0, 2 * Math.PI);
        ctx.fillStyle = this.color.color;
        ctx.fill();
      };
      new Ball(300, 300, 'red').draw();
    </script>
  </body>
</html>
15. 组合模式
又称整体-部分模式。将对象组合成树形结构以表示部分-整体的层次结构。
1
2
3
4
5
6
7
8
9
10
11
12
13
14
15
16
17
18
19
20
21
22
23
24
25
26
27
28
29
30
31
32
33
34
35
36
37
38
39
40
41
42
43
44
45
46
47
48
49
50
51
52
53
54
55
56
57
58
59
60
61
62
63
64
65
66
67
68
69
70
71
72
<!DOCTYPE html>
<html lang="en">
  <head>
    <meta charset="UTF-8" />
    <meta name="viewport" content="width=device-width, initial-scale=1.0" />
    <meta http-equiv="X-UA-Compatible" content="ie=edge" />
    <title></title>
    <style>
      .red {
        color: red;
      }
    </style>
  </head>
  <body>
    <div id="root"></div>
    <script>
      function ReactElement(type, props) {
        this.type = type;
        this.props = props;
      }
      let React = {
        createElement(type, props = {}, ...childrens) {
          childrens.length === 1 ? (childrens = childrens[0]) : void 0;
          return new ReactElement(type, { ...props, children: childrens });
        },
      };
      let render = (eleObj, container) => {
        // 先取出第一层 进行创建真实dom
        let { type, props } = eleObj;
        let elementNode = document.createElement(type); // 创建第一个元素
        for (let attr in props) {
          // 循环所有属性
          if (attr === 'children') {
            // 如果是children表示有嵌套关系
            if (typeof props[attr] == 'object') {
              // 看是否是只有一个文本节点
              props[attr].forEach((item) => {
                // 多个的话循环判断 如果是对象再次调用render方法
                if (typeof item === 'object') {
                  render(item, elementNode);
                } else {
                  //是文本节点 直接创建即可
                  elementNode.appendChild(document.createTextNode(item));
                }
              });
            } else {
              // 只有一个文本节点直接创建即可
              elementNode.appendChild(document.createTextNode(props[attr]));
            }
          } else if (attr === 'className') {
            // 是不是class属性 class 属性特殊处理
            elementNode.setAttribute('class', props[attr]);
          } else {
            elementNode.setAttribute(attr, props[attr]);
          }
        }
        container.appendChild(elementNode);
      };
      //ReactDOM.render(<div>hello<span>world</span></div>);
      //ReactDOM.render(React.createElement("div",null,"hello,",React.createElement("span",null,"world")));
      render(
        React.createElement(
          'div',
          null,
          'hello,',
          React.createElement('span', { class: 'red' }, 'world')
        ),
        document.getElementById('root')
      );
    </script>
  </body>
</html>
使用场景
1
2
3
4
5
6
7
8
9
10
11
12
13
14
15
16
17
18
19
20
21
22
23
24
25
26
27
28
29
30
31
32
33
34
35
36
37
38
39
40
41
42
43
44
45
46
47
48
49
50
51
52
53
54
55
// 绘制表单
class FormContainer {
  constructor(type) {
    this.element = document.createElement(type);
    this.children = [];
  }
  add(child) {
    this.children.push(child);
    this.element.appendChild(child.element);
    return this;
  }
}
class FieldContainer {
  constructor(type) {
    this.element = document.createElement(type);
    this.children = [];
  }
  add(child) {
    this.children.push(child);
    this.element.appendChild(child.element);
    return this;
  }
}
class LabelItem {
  constructor(title) {
    this.element = document.createElement('label');
    this.element.innerHTML = title;
  }
}
class InputItem {
  constructor(title) {
    this.element = document.createElement('input');
    this.element.name = title;
  }
}
class TipItem {
  constructor(title) {
    this.element = document.createElement('span');
    this.element.innerHTML = title;
  }
}
let userform = new FormContainer('form')
  .add(
    new FieldContainer('p')
      .add(new LabelItem('用户名'))
      .add(new InputItem('username'))
      .add(new TipItem('用户名长度为6-8位'))
  )
  .add(
    new FieldContainer('p')
      .add(new LabelItem('密码'))
      .add(new InputItem('password'))
      .add(new TipItem('确认密码'))
  );
document.body.appendChild(userform.element);
16. 命令模式
执行命令时,发布者和执行者分开,中间加入命令对象,作为中转站
三种角色
Receiver接受者角色:该角色就是干活的角色,命令传递到这里是应该被执行的Command命令角色:需要执行的所有命令都在这里声明Invoker调用者角色:接收到命令,并执行命令
1
2
3
4
5
6
7
8
9
10
11
12
13
14
15
16
17
18
19
20
21
22
23
24
25
26
27
28
29
30
31
32
33
34
35
36
37
38
39
40
41
42
43
44
class Cooker {
  cook() {
    console.log(`做饭`);
  }
}
class Cleaner {
  clean() {
    console.log(`清洁`);
  }
}
class CookCommand {
  constructor(cooker) {
    this.cooker = cooker;
  }
  execute() {
    this.cooker.cook();
  }
}
class CleanCommand {
  constructor(cleaner) {
    this.cleaner = cleaner;
  }
  execute() {
    this.cleaner.clean();
  }
}
class Customer {
  constructor(command) {
    this.command = command;
  }
  cook() {
    this.command.execute();
  }
  clean() {
    this.command.execute();
  }
}
let cooker = new Cooker();
let command = new CookCommand(cooker);
let c = new Customer(command);
c.cook();
let cleaner = new Cleaner();
c.command = new CleanCommand(cleaner);
c.clean();
使用场景
1
2
3
4
5
6
7
8
9
10
11
12
13
14
15
16
17
18
19
20
21
22
23
24
25
26
27
28
29
30
31
32
33
34
35
36
37
38
39
40
41
42
43
44
45
46
47
48
49
50
51
52
53
54
55
// 撤销和重做
<!DOCTYPE html>
<html lang="en">
  <head>
    <meta charset="UTF-8" />
    <meta name="viewport" content="width=device-width, initial-scale=1.0" />
    <meta http-equiv="X-UA-Compatible" content="ie=edge" />
    <title>弹出菜单</title>
  </head>
  <body>
    <p id="number">0</p>
    <button id="addBtn">+</button>
    <button id="undoBtn">undo</button>
    <script>
      let addBtn = document.getElementById('addBtn');
      let undoBtn = document.getElementById('undoBtn');
      let number = document.getElementById('number');

      let worker = {
        lastVal: -1,
        add() {
          let oldVal = parseInt(number.innerHTML);
          worker.lastVal = oldVal;
          number.innerHTML = oldVal + 1;
        },
        undo() {
          number.innerHTML = worker.lastVal;
        },
      };

      class AddCommand {
        constructor(receiver) {
          this.receiver = receiver;
        }
        execute() {
          this.receiver.add();
        }
      }

      let addCommand = new AddCommand(worker);
      class UndoCommand {
        constructor(receiver) {
          this.receiver = receiver;
        }
        execute() {
          this.receiver.undo();
        }
      }

      let undoCommand = new UndoCommand(worker);
      addBtn.onclick = () => addCommand.execute();
      undoBtn.onclick = () => undoCommand.execute();
    </script>
  </body>
</html>
17. 享元模式
共享内存,节约内存空间。主要还是对数据、方法共享分离,将数据的方法分为内部数据、内部方法和外部数据、外部方法。内部状态保存在对象内部,通常不会改变,可以共享。外部状态保存在对象外部,可以随场景改变,不可以共享。
1
2
3
4
5
6
7
8
9
10
function Person(name, age) {
  this.name = name;
  this.age = age;
}
Person.prototype.getAge = function () {
  console.log(this.age);
};
Person.prototype.getName = function () {
  console.log(this.name);
};
使用场景
1
2
3
4
5
6
7
8
9
10
11
12
13
14
15
16
17
18
19
20
21
22
23
24
25
26
27
28
29
30
31
32
33
34
35
36
37
38
39
40
41
42
43
// 分页
<!DOCTYPE html>
<html lang="en">
  <head>
    <meta charset="UTF-8" />
    <meta name="viewport" content="width=device-width, initial-scale=1.0" />
    <meta http-equiv="X-UA-Compatible" content="ie=edge" />
    <title>Document</title>
  </head>
  <body>
    <ul id="news"></ul>
    <button id="nextPage" onclick="goNext()">下一页</button>
    <script>
      let list = [];
      for (let i = 0; i < 20; i++) {
        list[i] = `新闻${i + 1}`;
      }
      let pageNum = 0;
      let pageSize = 5;
      let news = document.getElementById('news');
      for (let i = 0; i < list.length; i++) {
        let li = document.createElement('li');
        li.innerHTML = `新闻${i + 1}`;
        li.style.display = 'none';
        news.appendChild(li);
      }
      function goNext() {
        pageNum++;
        let start = (pageNum - 1) * pageSize;
        let lis = document.getElementsByTagName('li');
        for (let i = 0; i <= lis.length; i++) {
          let li = lis[i];
          if (i >= start && i < start + pageSize) {
            li.style.display = 'block';
          } else {
            li.style.display = 'none';
          }
        }
      }
      goNext();
    </script>
  </body>
</html>
18. 模板方法
模板方法模式在一个方法中定义一个算法的骨架,而将一些步骤的实现延迟到子类中,使得子类可以在不改变算法结构的情况下,重新定义算法中某些步骤的具体实现。
1
2
3
4
5
6
7
8
9
10
11
12
13
14
15
16
17
18
19
20
21
22
23
class Person {
  dinner() {
    this.buy();
    this.cook();
    this.eat();
  }
  buy() {}
  cook() {}
  eat() {}
}
class Jiangwen extends Person {
  buy() {
    console.log('买黄瓜');
  }
  cook() {
    console.log('拍黄瓜');
  }
  eat() {
    console.log('吃黄瓜');
  }
}
let j = new Jiangwen();
j.dinner();
19. 职责链模式
一步操作可能分为多个职责角色来完成,把这些角色都分开,然后用一个链串起来。
1
2
3
4
5
6
7
8
9
10
11
12
13
14
15
16
17
18
19
20
21
22
23
24
25
26
27
class Employee {
  constructor(next) {
    this.next = next;
  }
}
class GroupLeader extends Employee {
  audit() {
    console.log(`组长已经审批!`);
    this.next && this.next.audit();
  }
}
class Manager extends Employee {
  audit() {
    console.log(`经理已经审批!`);
    this.next && this.next.audit();
  }
}
class Boss extends Employee {
  audit() {
    console.log(`老板已经审批!`);
    this.next && this.next.audit();
  }
}
let boss = new Boss();
let manager = new Manager(boss);
let groupLeader = new GroupLeader(manager);
groupLeader.audit();
20. 备忘录模式
记录一个对象的变化,可以恢复之前的某个状态。
1
2
3
4
5
6
7
8
9
10
11
12
13
14
15
16
17
18
19
20
21
22
23
24
25
26
27
28
29
30
31
32
33
34
35
36
37
38
39
40
41
42
43
44
45
46
47
<input type="text" id="content" />
<button id="save-btn">保存</button>
<button id="prev-btn">上一步</button>
<button id="next-btn">下一步</button>
<script>
  let content = document.getElementById('content');
  let saveBtn = document.getElementById('save-btn');
  let prevBtn = document.getElementById('prev-btn');
  let nextBtn = document.getElementById('next-btn');
  class Memo {
    constructor(content) {
      this.content = content;
    }
  }
  class Memos {
    constructor() {
      this.index = 0;
      this.list = [new Memo('')];
    }
    add(content) {
      this.list[++this.index] = new Memo(content);
    }
    get() {
      return this.list[this.index];
    }
    prev() {
      if (this.index == 0) return alert('没有上一步');
      return this.list[--this.index];
    }
    next() {
      if (this.index == this.list.length - 1) return alert('没有下一步');
      return this.list[++this.index];
    }
  }
  let memos = new Memos();
  saveBtn.addEventListener('click', function () {
    memos.add(content.value);
  });
  prevBtn.addEventListener('click', function () {
    let memo = memos.prev();
    content.value = memo.content;
  });
  nextBtn.addEventListener('click', function () {
    let memo = memos.next();
    content.value = memo.content;
  });
</script>
21. 中介者模式
1
2
3
4
5
6
7
8
9
10
11
12
13
14
15
16
17
18
19
20
21
22
23
24
25
26
27
28
29
30
31
32
33
34
35
36
37
class Boy {
  constructor(mediator) {
    this.mediator = mediator;
    this.salary = 1000;
  }
  learnGirl() {
    this.mediator.learnGirl();
  }
}
class Girl {
  constructor(mediator) {
    this.mediator = mediator;
    this.age = 28;
  }
  learnBoy() {
    this.mediator.learnBoy();
  }
}
class Mediator {
  constructor(boy, girl) {
    this.boy = boy;
    this.girl = girl;
  }
  learnBoy() {
    console.log(`这个男孩月薪${this.boy.salary * 10}`);
  }
  learnGirl() {
    console.log(`这个女孩年龄${this.girl.age - 10}`);
  }
}
let boy = new Boy();
let girl = new Girl();
let mediator = new Mediator(boy, girl);
boy.mediator = mediator;
girl.mediator = mediator;
boy.learnGirl();
girl.learnBoy();
22. 访问者模式
将数据操作和数据结构进行分离。
有这么一个操作,它是作用于一些元素之上的,而这些元素属于某一个对象结构。同时这个操作是在不改变各元素类的前提下,在这个前提下定义新操作是访问者模式精髓中的精髓。
1
2
3
4
5
6
7
8
9
10
11
12
13
14
15
16
17
18
19
20
21
22
23
24
25
26
27
28
29
30
31
32
33
34
35
36
37
38
39
40
41
42
43
44
45
46
47
48
49
50
51
52
53
54
55
56
57
58
59
60
class Father {
  constructor(name, wealth) {
    this.name = name;
    this.wealth = wealth;
  }
  accept(viewer) {
    viewer.viewFather(this);
  }
}
class Mother {
  constructor(name, character) {
    this.name = name;
    this.character = character;
  }
  accept(viewer) {
    viewer.viewMother(this);
  }
}
class Son {
  constructor(name, look) {
    this.name = name;
    this.look = look;
  }
  accept(viewer) {
    viewer.viewSon(this);
  }
}
class Family {
  constructor(father, mother, son) {
    this.father = father;
    this.mother = mother;
    this.son = son;
  }
  view(viewer) {
    this.father.accept(viewer);
    this.mother.accept(viewer);
    this.son.accept(viewer);
  }
}

class Girl {
  constructor(name) {
    this.name = name;
  }
  viewFather(father) {
    console.log(`${this.name} ${father.name} 的财富 ${father.wealth}`);
  }
  viewMother(mother) {
    console.log(`${this.name} ${mother.name} 的性格 ${mother.character}`);
  }
  viewSon(son) {
    console.log(`${this.name} ${son.name} 的相貌 ${son.look}`);
  }
}
let father = new Father('冯爸爸', 999999);
let mother = new Mother('冯妈妈', '温柔');
let son = new Son('冯绍峰', '帅');
let family = new Family(father, mother, son);
let zhaoliying = new Girl('赵丽颖');
family.view(zhaoliying);
使用场景
1
2
3
4
5
6
7
8
9
10
11
12
13
14
let babel = require('babel-core');
let t = require('babel-types');
let preCalculator = {
  visitor: {
    BinaryExpression(path) {
      let node = path.node;
      console.log(node.operator);
    },
  },
};
const result = babel.transform('const sum = 1+2', {
  plugins: [preCalculator],
});
//console.log(result.code);
23. 解释器模式
描述语言语法如何定义,如何解释和编译