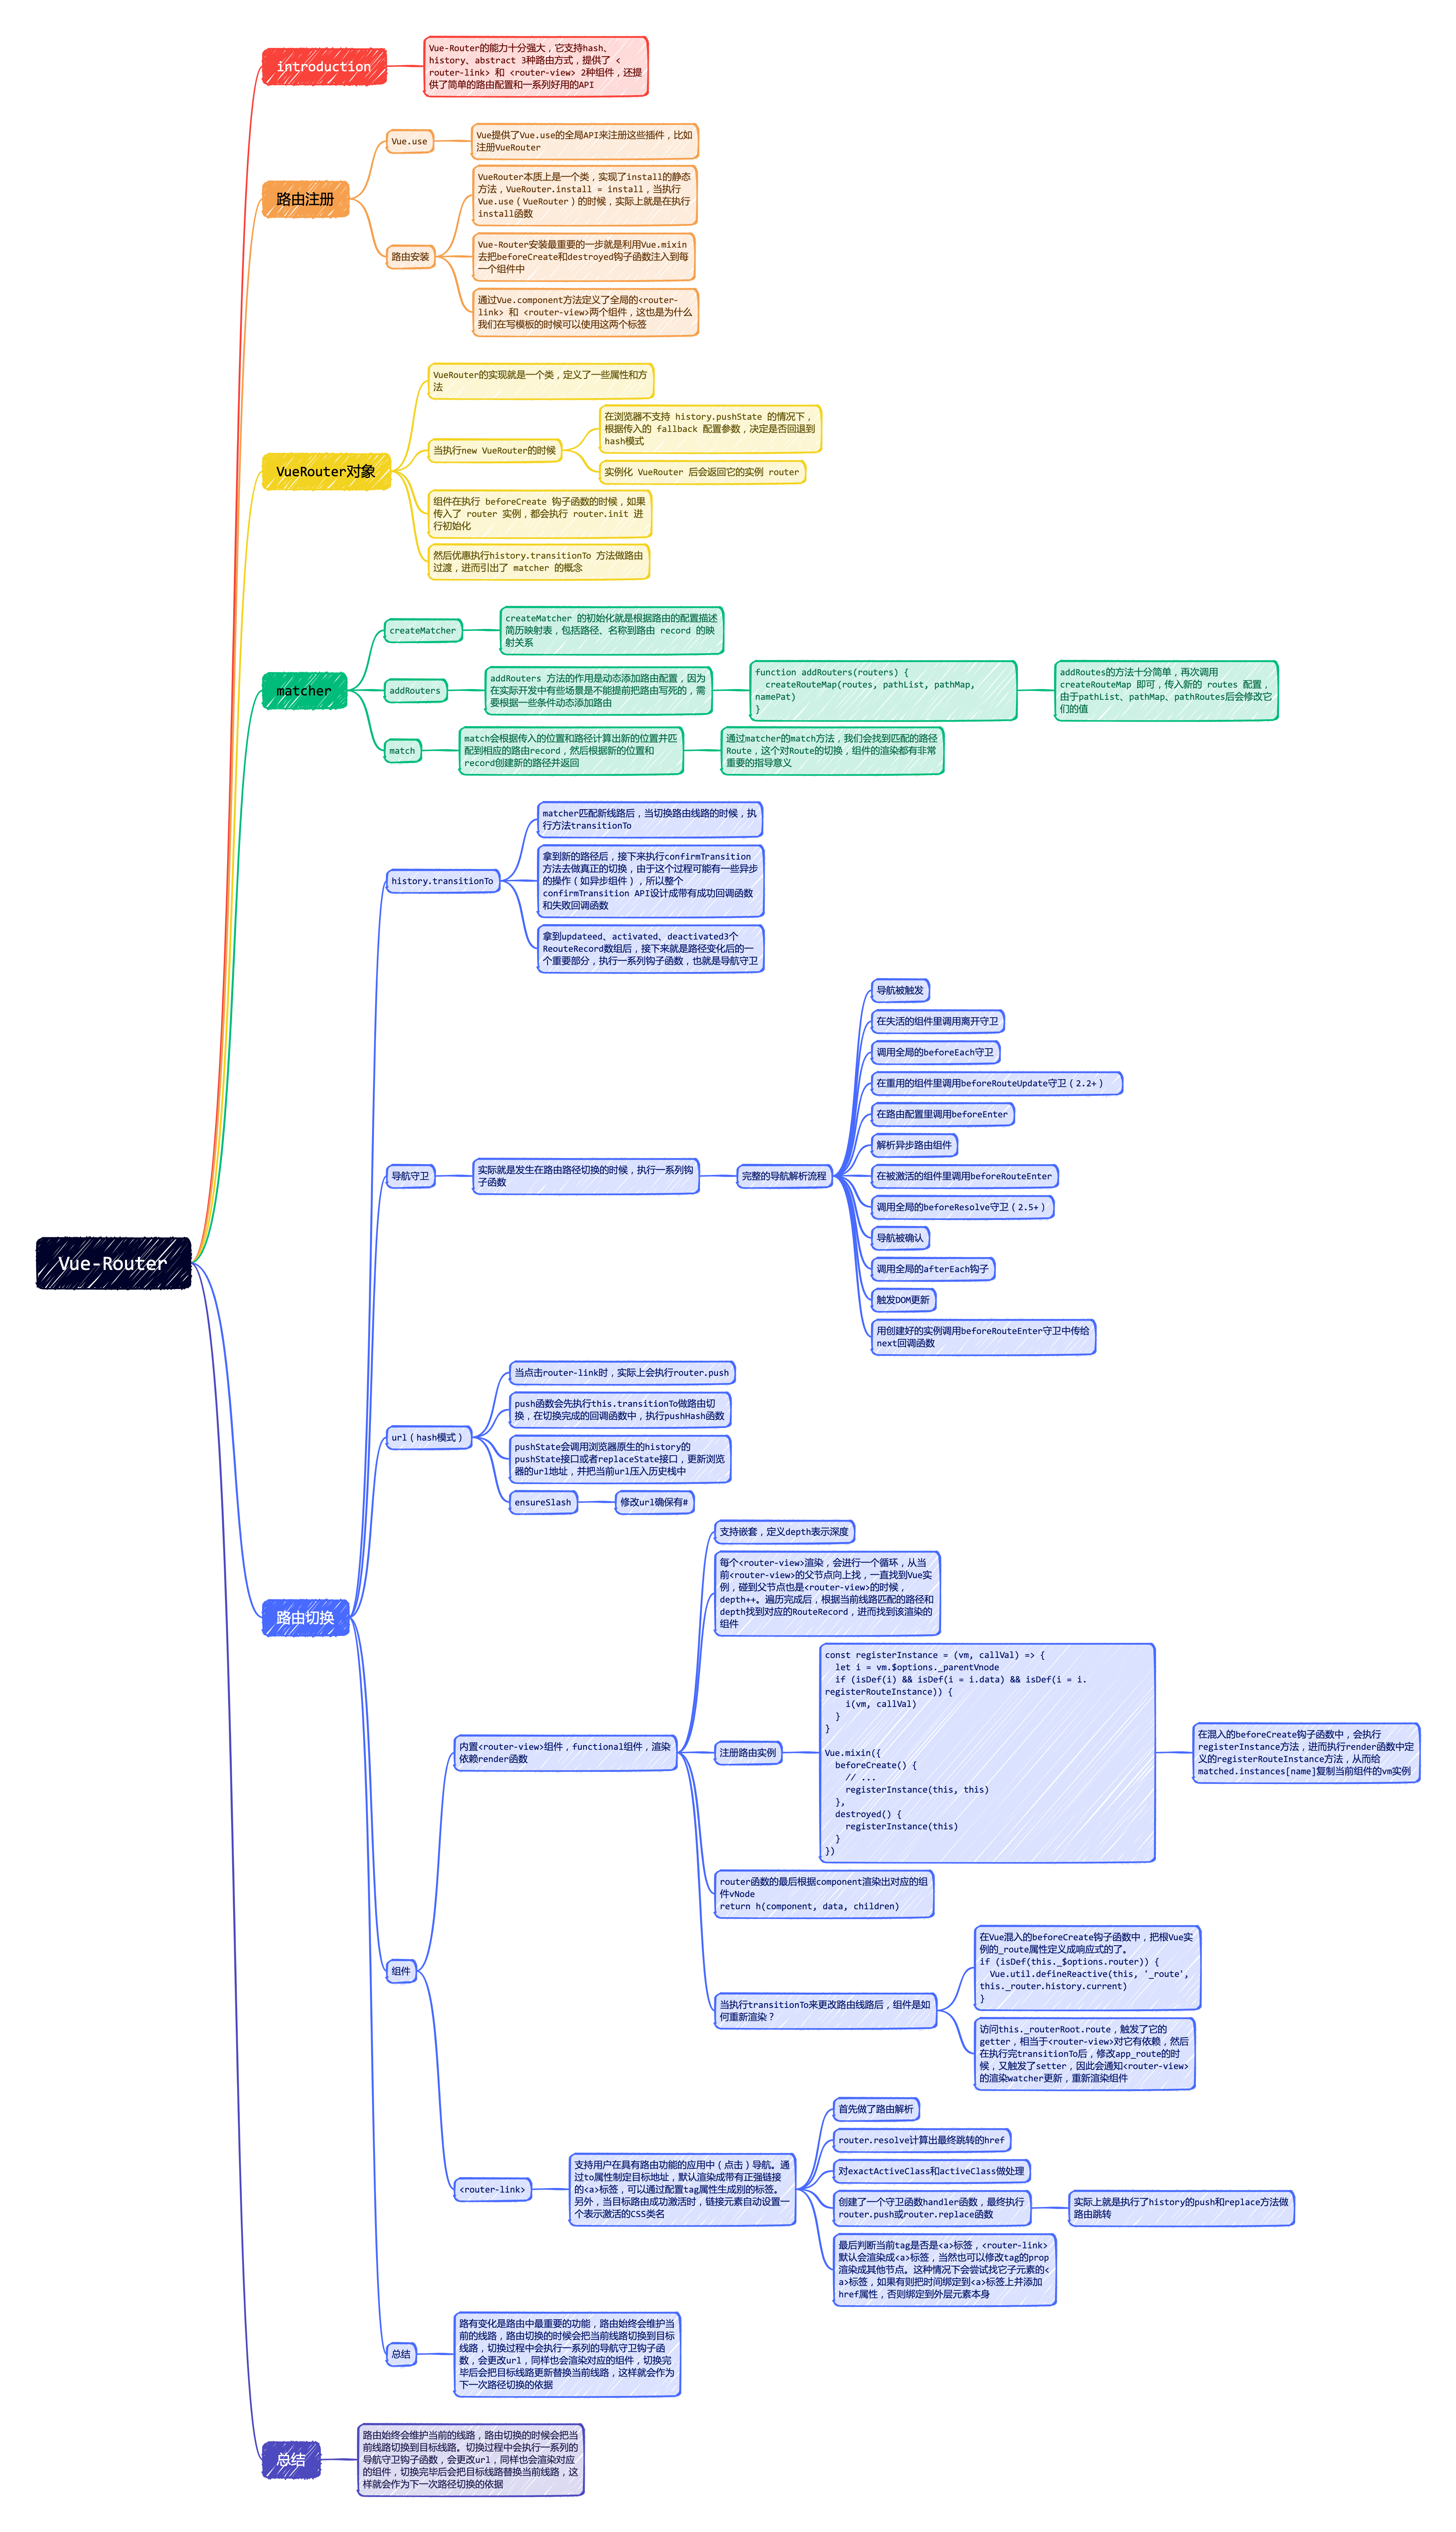
Vue-Router 源码深度剖析
一.Vue-Router 基本应用
通过 Vue 路由的基本配置来探索 Vue-Router
1
2
3
4
5
6
7
8
9
10
11
12
13
14
15
16
17
18
19
20
21
22
23
24
25
26
27
28
29
30
31
32
33
34
35
36
37
38
39
40
41
42
43
44
45
46
47
48
49
50
51
52
53
54
55
56
57
58
59
60
61
62
63
64
65
66
67
68
69
70
71
72
73
74
75
76
77
78
79
80
81
import Vue from 'vue';
// import VueRouter from 'vue-router'; // 官方
import VueRouter from '../vue-router/index.js'; // 手写
import HomeView from '../views/HomeView.vue';

Vue.use(VueRouter);

const routes = [
  {
    path: '/',
    name: 'home',
    component: HomeView,
  },
  {
    path: '/about',
    name: 'about',
    // route level code-splitting
    // this generates a separate chunk (about.[hash].js) for this route
    // which is lazy-loaded when the route is visited.
    component: () =>
      import(/* webpackChunkName: "about" */ '../views/AboutView.vue'),
    children: [
      {
        path: 'a',
        component: {
          render() {
            return <h1>about a页面</h1>;
          },
        },
      },
      {
        path: 'b',
        component: {
          render() {
            return <h1>about b页面</h1>;
          },
        },
      },
    ],
  },
];

// 在创造路由的时候 将组件和路径进行格式化操作
// / => recored(component:Home)
// /about => recored(component:About)
// /about/a => recored(component:a)
// /about/b => recored(component:b)
const router = new VueRouter({
  mode: 'history',
  routes,
});

router.addRoutes([
  {
    path: '/about',
    children: [
      {
        path: 'xxx',
        component: {
          render: function () {
            return <h1>xxx</h1>;
          },
        },
      },
    ],
  },
]);

router.beforeEach((from, to, next) => {
  setTimeout(() => {
    console.log(from, to);
    next();
  }, 1000);
});

export default router;

new Vue({
  router,
  render: (h) => h(App),
}).$mount('#app');
核心方法是 Vue.use(Router),再就是new Router产生router实例
二.编写 Vue-Router
这里开始我们来实现一个Vue-router插件,先来看下整体目录结构
1
2
3
4
5
6
7
8
9
10
11
vue-router
├── components # 存放vue-router两个组件
│   ├── router-link.js
│   └── router-view.js
├── create-matcher.js # 创建匹配器,路由映射表
├── history # 存放浏览器跳转相关逻辑
│   ├── base.js
│   ├── hash.js
│   └── history.js
├── index.js # 引用时的入口文件
└── install.js # install方法
默认我们引用Vue-Router使用的是index.js文件,use方法默认调用当前返回对象的install方法
1
2
3
import install from './install';
export default class VueRouter {}
VueRouter.install = install; // 提供的install方法
下面先看下 install 中做了什么?
2.1.编写 install 方法
1
2
3
4
5
6
7
8
9
10
11
12
13
14
15
16
17
18
19
20
21
22
23
24
25
// 我们可以通过组件的_routerRoot._router路由的实例 实现了路由实例的共享
export let Vue;
const install = (_Vue) => {
  Vue = _Vue;
  Vue.mixin({
    beforeCreate() {
      // 给所有组件的生命周期都增加beforeCreate方法
      if (this.$options.router) {
        // 如果有router属性说明是根实例
        this._routerRoot = this; // 将根组件暴露到了this上
        this._router = this.$options.router;
        this._router.init(this); // this._router.history.current

        // 就是响应式中的defineReactive API 这个源码可能会变
        // 组件参数变化了 要重新渲染页面 页面内部改的是current
        // 页面渲染的时候 用的是this._route
        // 把这个current属性定义到_route上面去
        Vue.util.defineReactive(this, '_route', this._router.history.current);
      } else if (this.$parent && this.$parent._routerRoot) {
        this._routerRoot = this.$parent._routerRoot; // 每个组件都可以通过this._routerRoot拿到根组件的实例
        // 可以通过this._routerRoot._router获取路由的实例
      }
    },
  });
};
这里我们应该在Vue-Router上增加一个init方法,主要目的就是初始化功能
这里强调下,什么是路由?路由就是匹配到对应路径显示对应的组件!
1
2
3
4
5
6
7
8
9
10
11
12
13
14
15
16
17
18
19
20
21
22
23
24
25
26
// index.js
import { createMatcher } from './create-matcher';
import install from './install';
class VueRouter {
  constructor(options = {}) {
    // 根据路由的配置参数进行格式化操作 {}
    // 创建一个匹配器 用于匹配记录
    // 根据用户传递的routes创建匹配关系 this.matcher需要提供两个方法
    // match 方法用来匹配规则
    // addRouters用来动态添加路由
    this.matcher = createMatcher(options.routes || []); // 两个方法 match addRouters

    switch (options.mode) {
      case 'hash': // hash window.location.hash
        this.history = new HashHistory(this);
        break;
      case 'history': // history.pushState popstate事件
        this.history = new BrowserHistory(this);
        break;
    }

    this.beforeEachHooks = [];
  }
  init(app) {}
}
VueRouter.install = install; // 提供的install方法
2.2.编写 createMatcher 方法
1
2
3
4
5
6
7
8
9
10
11
12
13
14
15
16
17
18
19
20
export const createMatcher = (routes) => {
  let { pathMap } = createRouteMap(routes); // {path:'/',record:{},path:'/about',record}
  function match(location) {
    // 路径对应的匹配路由是谁 matched:[about,aboutA] this.$routes.matched
    let record = pathMap[location];
    return createRoute(record, {
      // 根据记录创建对应的路由 {path:/about/a,matched:[about,aboutA]}
      path: location,
    });
  }
  function addRoutes(routes) {
    // 将新的routes 也增加到pathMap中
    return createRouteMap(routes, pathMap);
  }
  return {
    match,
    addRoutes,
    pathMap,
  };
};
然后需要创建映射关系,添加createRouteMap方法
2.3.编写 createRouteMap 方法
1
2
3
4
5
6
7
8
9
10
11
12
13
14
15
16
17
18
19
20
21
22
23
24
25
26
27
28
29
30
31
32
33
34
35
36
37
function createRouteMap(routes, oldMap) {
  const pathMap = oldMap || Object.create(null);
  routes.forEach((route) => {
    // 添加到路由记录 用户配置可能无限层级 稍后要递归调用此方法
    addRouteRecord(pathMap, route);
  });
  return {
    // 导出映射关系
    pathMap,
  };
}
// /about/a/b 三个组件 /about[recore] /about/a/[record2] /about/a/b[record3]
// /about/a/b -> 通过匹配到的记录向上查找parent属性将记录维护起来 [record1,record2]
function addRouteRecord(pathMap, route, parentRecord) {
  // /about/a 匹配几个组件?
  // 可以动态添加路由
  // 如果是子路由记录 需要增加前缀
  let path = parentRecord ? `${parentRecord.path}/${route.path}` : route.path;
  // 提取需要信息
  let record = {
    // 稍后会添加一些路径
    path,
    component: route.component,
    parent: parentRecord,
    // meta props name ...
  };
  if (!pathMap[path]) {
    pathMap[path] = record;
  }
  if (route.children) {
    // 递归添加子路由
    route.children.forEach((childRoute) => {
      // 这里需要标记父亲是谁
      addRouteRecord(pathMap, childRoute, record);
    });
  }
}
此方法主要处理路径和不同路径对应的记录
matcher 先写到这,稍后补全 match 方法的视线
2.4.编写浏览器历史相关代码
1
2
3
4
5
6
7
8
9
10
11
12
13
14
15
16
17
18
19
20
import HashHistory from './history/hash';
import BrowserHistory from './history/history';
constructor(options = {}) {
  this.matcher = createMatcher(options.routes || []); // 两个方法 match addRouters
  switch (options.mode) {
    case 'hash': // hash window.location.hash
      this.history = new HashHistory(this);
      break;
    case 'history': // history.pushState popstate事件
      this.history = new BrowserHistory(this);
      break;
  }
}
// 路由基类
class Base {
  constructor(router) {
    this.router = router;
  }
}
export default Base;
这里以hash路由为主,创建路由实例
1
2
3
4
5
6
7
8
9
10
11
12
13
14
15
16
17
import Base from './base';
class HashHistory extends Base {
  constructor(route) {
    super(route);
  }=
  getCurrentLocation() {}
  setupListener() {}
}
export default HashHistory;

// 路由基类
class Base {
  constructor(router) {
    this.router = router;
  }
}
export default Base;
如果是hash路由,打开网站如果没有hash则默认添加#/
1
2
3
4
5
6
7
8
function ensureSlash() {
  if (!window.location.hash) {
    window.location.hash = '/';
  }
}
constructor(route) {
  ensureSlash();
}
稍后再继续扩展路由相关代码,现在我们先把焦点转向初始化逻辑
1
2
3
4
5
6
7
8
9
10
11
12
13
14
15
16
// index.js
init(app) {
  const history = this.history;
  // 初始化时,应该先拿到当前路径,进行匹配逻辑

  // 让路由系统过度到某个路径
  const setupHashListener = () => {
    history.setupListener(); // 监听路径变化
  };
  history.transitionTo(
    // 父类提供方法负责跳转
    history.getCurrentLocation(), // 子类获取对应的路径
    // 跳转成功后注册路径监听,为视图更新做准备
    setupHashListener
  );
}
这里我们要分别实现transitionTo(基类方法)、getCurrentLocation、setupListener
getCurrentLocation 实现
1
2
3
4
5
6
7
8
9
10
// hash.js
function getHash() {
  return window.location.hash.slice(1);
}
class HashHistory extends Base {
  // ...
  getCurrentLocation() {
    return getHash();
  }
}
setupListener 实现
1
2
3
4
5
6
7
8
9
class HashHistory extends Base {
  // ...
  setupListener() {
    window.addEventListener('hashchange', () => {
      // 监听hash值的变化 hash变化后再调用transitionTo方法
      this.transitionTo(getHash());
    });
  }
}
transitionTo 实现
1
2
3
4
5
6
7
8
9
10
11
12
13
14
15
16
17
18
19
20
21
22
23
24
25
// base.js
import { createRoute } from '../create-matcher';
class Base {
  constructor(router) {
    this.router = router;
    this.current = createRoute(null, {
      path: '/',
    });
  }
  // 核心逻辑
  transitionTo(location, listener) {
    // 根据路径匹配到记录
    let route = this.router.match(location);
    // 让数组中的钩子组合起来依次调用 都调用完毕执行自己的逻辑
    this.updateRoute(route); // 用最新的route更新current和_route
    // window.location.hash window.addEventListener
    listener && listener(); // 完成后调用用户回调
  }
  updateRoute(route) {
    // 更新路由即可
    this.current = route;
    this.cb && this.cb(route); // hack 钩子
  }
}
export default Base;
1
2
3
4
5
6
class VueRouter {
  // ...
  match(location) {
    return this.matcher.match(location); // {path:'/about/a',matched:[]}
  }
}
回头继续完善刚才没有写完的match方法
1
2
3
4
5
6
7
8
9
// create-matcher.js
function match(location) {
  // 路径对应的匹配路由是谁 matched:[about,aboutA] this.$routes.matched
  let record = pathMap[location];
  return createRoute(record, {
    // 根据记录创建对应的路由 {path:/about/a,matched:[about,aboutA]}
    path: location,
  });
}
我们不难发现路径变化时都会更改current属性,我们可以把current属性变成响应式的,每次current变化刷新视图即可
1
2
3
4
5
6
7
8
9
10
11
12
13
14
15
16
17
18
19
20
21
22
23
24
25
26
27
28
29
30
31
32
// 此install方法实现了将根实例放到了_routerRoot
// 我们将router实例放到了根实例上

import RouterView from './components/router-view';
import RouterLink from './components/router-link';

// 我们可以通过组件的_routerRoot._router路由的实例 实现了路由实例的共享
export let Vue;
const install = (_Vue) => {
  Vue = _Vue;
  Vue.mixin({
    beforeCreate() {
      // 给所有组件的生命周期都增加beforeCreate方法
      if (this.$options.router) {
        // ...
        Vue.util.defineReactive(this, '_route', this._router.history.current);
      }
      // ...
    },
  });
  // 仅仅为了更加方便
  Object.defineProperty(Vue.prototype, '$route', {
    get() {
      return this._routerRoot._route; // 都是属性 对应的就是this.current
    },
  });
  Object.defineProperty(Vue.prototype, '$router', {
    get() {
      return this._routerRoot._router; // 存的都是方法 this.$router.addRoutes this.$router.push
    },
  });
};
Vue.util.defineReactive这个方法是vue中响应式数据变化的核心
当路径变化时需要执行此回调更新_route属性,在init方法中增加监听函数
1
2
3
4
5
6
7
8
// index.js
init(app) {
  // ...
  history.listen((route) => {
    // 这个回调的目的是更新app._route 这个_route是一个响应式的变量
    app._route = route;
  });
}
1
2
3
4
5
6
7
8
9
10
11
12
13
// base.js
class Base {
  // ...
  updateRoute(route) {
    // 更新路由即可
    this.current = route;
    this.cb && this.cb(route); // hack 钩子
  }
  listen(cb) {
    // 设置一个回调方法
    this.cb = cb;
  }
}
三.编写 Router-Link 及 Router-View 组件
3.1.router-view 组件
1
2
3
4
5
6
7
8
9
10
11
12
13
14
15
16
17
18
19
20
21
22
23
24
export default {
  functional: true, // 函数式组件 它没有自己的状态 所以性能更好 正常组件是一个类组件 每次使用这个组件都要new 函数式组件可以直接拿到返回的虚拟节点来渲染
  render(h, { parent, data }) {
    let route = parent.$route; // 拿到的就是我们刚才定义的那个响应式数据
    // 级联组件
    let depth = 0;
    data.routerView = true; // 先默认肯定是渲染根组件
    while (parent) {
      // 根据当前组件向上查找
      // $vnode表示这个组件的虚拟节点 _vnode表示组件渲染vnode
      // 根据matched 渲染对应的router-view
      if (parent.$vnode && parent.$vnode.data.routerView) {
        depth++;
      }
      parent = parent.$parent; // 不停地找爸爸 找到最顶层
    }
    let record = route.matched[depth];
    if (!record) {
      return h();
    }
    // 组件渲染时先父后子 App.vue(router-view) About(router-view)
    return h(record.component, data);
  },
};
3.2.router-link 组件
1
2
3
4
5
6
7
8
9
10
11
12
13
14
15
16
17
18
19
20
21
22
23
24
export default {
  props: {
    to: {
      type: String,
      required: true,
    },
    tag: {
      type: String,
      default: 'a',
    },
  },
  methods: {
    handleClick() {
      // 可能是hash模式 还有可能是history模式
      // window.location.hash = this.to;
      this.$router.push(this.to);
    },
  },
  render(h) {
    // 复杂的组件全部可以采用render函数的写法
    const tagName = this.tag;
    return <tagName onClick={this.handleClick}>{this.$slots.default}</tagName>;
  },
};
最后注册 Vue 组件 RouterLink 和 RouterView
1
2
3
4
5
6
7
8
// install.js
import RouterView from './components/router-view';
import RouterLink from './components/router-link';
const install = (_Vue) => {
  // ...
  Vue.component('RouterLink', RouterLink);
  Vue.component('RouterView', RouterView);
};
四.beforeEach 实现
1
2
3
4
5
// index.js
this.beforeEachHooks = [];
beforeEach(hooks) {
  this.beforeEachHooks.push(hooks);
}
将用户函数注册到数组中
1
2
3
4
5
6
7
8
9
10
11
12
13
14
15
16
17
18
19
20
21
22
23
24
25
26
// base.js
function runQueue(queue, from, to, callback) {
  // 异步迭代队列需要采用递归的方式来实现
  function next(index) {
    // koa express原理一致
    if (index >= queue.length) {
      return callback();
    }
    let hook = queue[index]; // from to next
    hook(from, to, () => next(index + 1));
  }
  next(0);
}
class Base {
  // ...
  transitionTo(location, listener) {
    // ...
    runQueue(this.router.beforeEachHooks, this.current, route, () => {
      // 让数组中的钩子组合起来依次调用 都调用完毕执行自己的逻辑
      this.updateRoute(route); // 用最新的route更新current和_route
      // window.location.hash window.addEventListener
      listener && listener(); // 完成后调用用户回调
    });
  }
  // ...
}